Skip to content

Chinch Bugs in Lawns: How to Spot Them and Get Rid of Them

Chinch Bugs in Lawns: How to Spot Them and Get Rid of Them

A brown patch that creeps outward from the hottest, sunniest corner of the lawn, usually along a driveway or sidewalk, is the classic start of a chinch bug problem. Water does not green it back up, and confirming the insects before treating can save needless work.

Signs of Chinch Bugs in a Lawn

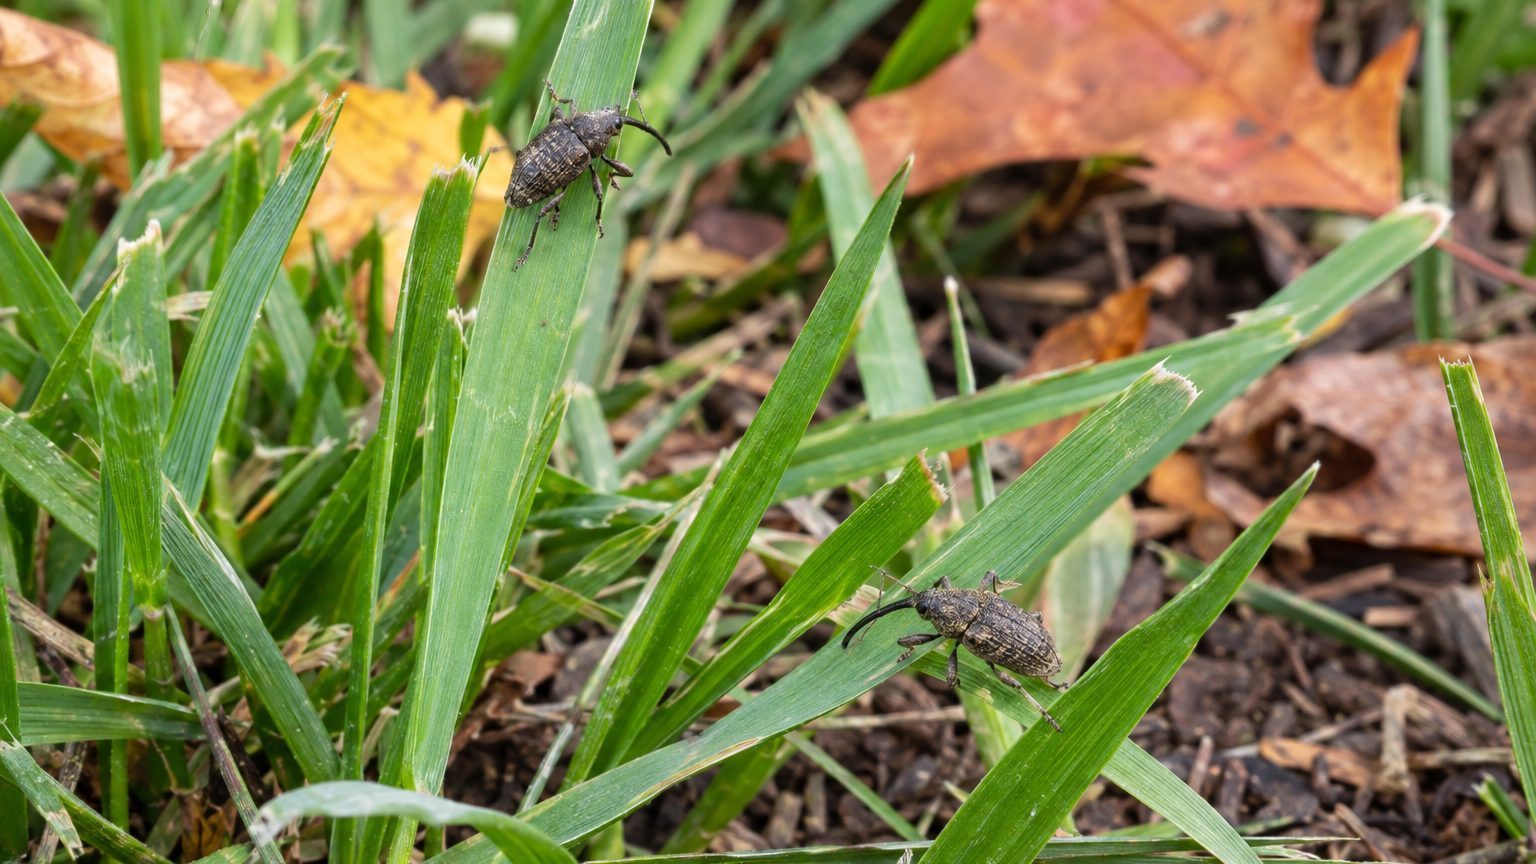
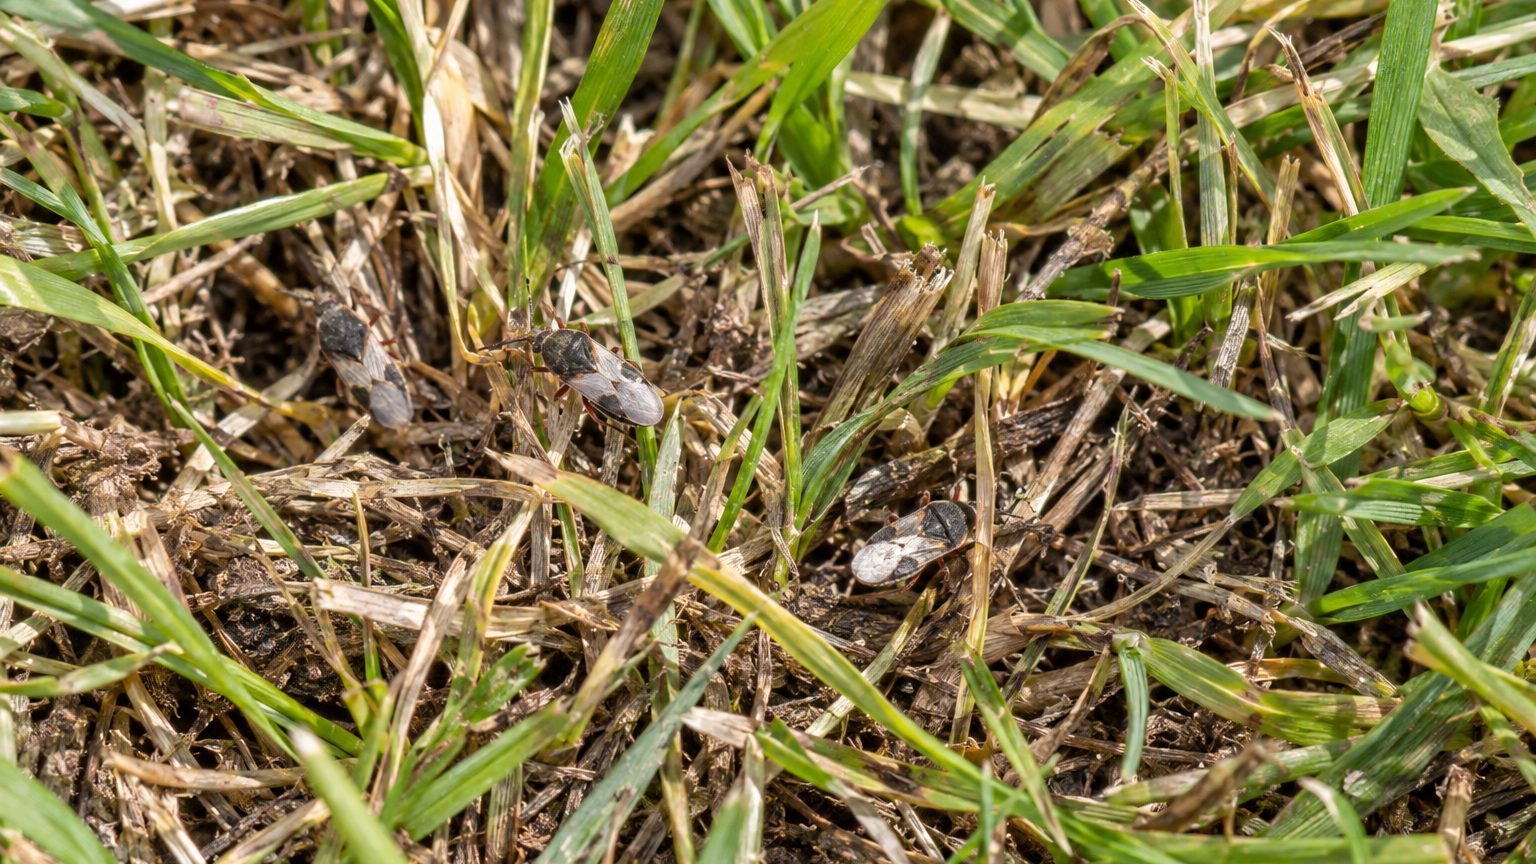
Chinch Bugs on a lawn

Start with the pattern of the damage, then get down on your knees at the edge of a patch to look for the insects themselves.

  • Patches of brown, dead grass spread outward over time instead of staying the same size.
  • Irregular areas first turn yellow, then brown, and the yellow rim sits right where the lawn is still green.
  • Damage shows up first in sunny spots during hot, dry stretches, often beside pavement.
  • Young nymphs are reddish with a white band across the back, and they darken to black as they near adult size.
  • Nymphs run from 1/20 to 1/5 inch long, while adults measure about 3.5 mm, so you will be looking for specks near the soil.

Part the grass at the base of the blades along the patch edge, where the insects hide in the thatch and around the crowns.

Lawn Damage Mistaken for Chinch Bugs

Several problems brown a lawn in summer, and drought stress is the one that fools people most, since chinch bugs also like heat and sun. Use the pattern of damage together with the insects at the grass bases to confirm the problem.

Looks like How to tell them apart
Drought stress: dull, bluish-brown turf in sunny areas Patches do not creep outward in a yellow rim, and no small insects turn up at the grass bases. The lawn perks up after a deep soaking.
Grub damage: irregular brown patches in summer The turf pulls up like loose carpet because the roots are chewed off. Chinch bug turf stays rooted, with insects at the crowns.

Dog urine spots can also look similar. They are round, with a dark green ring around a dead center, and they do not spread the way chinch bug patches do.

When Chinch Bugs Damage Shows Up

The damage comes from the insects sucking sap from the grass, and the injury usually becomes visible during hot, dry periods in the sunniest parts of the lawn. Warmth speeds everything up. In Ohio, eggs take about 20–30 days to hatch at temperatures below 70 degrees F but can hatch in as little as a week when above 80 degrees F, so a hot spell can speed population growth.

In Ohio, a single female may lay up to 200 eggs over 60–80 days, and populations warrant closer attention in June and July. In the Southeast, females lay around four eggs per day in leaf sheaths, thatch and soft soil.

Grass type decides how hard you are hit. Lawns with 50 percent or more bluegrass are the most likely to be attacked. St. Augustine grass is the most seriously injured, while zoysia, bermuda, bahia, and centipede grasses are also subject to attack. Perennial ryegrasses, fine fescues and tall fescues with endophytes are highly resistant.

The numbers needed for visible harm are modest. In Georgia, 20 to 25 chinch bugs per square foot can cause damage.

How to Get Rid of Chinch Bugs

Confirm the insects first, then act in this order so you do not spray a problem you do not have.

  1. For southern chinch bugs in California, inspect around the grass bases or run a drench test to confirm that the insects are present.
  2. Count the insects in a square foot, because in Ohio populations of 25–30 individuals per square foot warrant control, especially in June and July.
  3. Water the lawn if the soil is dry, since in Georgia the guidance is to keep pesticides off dry soil to avoid chemical injury to the turf.
  4. Contact your state extension office for what is currently approved and labeled where you live, since products and rules differ from state to state.
  5. Treat the whole damaged area plus a margin of green grass around it, because the insects keep moving into healthy turf at the edge.
  6. Reseed or resod dead patches once the insects are under control, using a resistant grass where your region allows it.

Dead turf does not regrow from the crowns, so expect to rebuild those spots rather than wait for them to green up.

How to Prevent Chinch Bugs

Prevention is mostly about keeping the lawn from becoming the soft, thatchy, stressed turf that chinch bugs favor, and the timing follows the season.

  • In California, reduce thatch when the layer is thicker than 1/2 inch, because thicker thatch encourages chinch bug and caterpillar populations.
  • In California, reduce nitrogen fertilization as a cultural control for southern chinch bugs.
  • In California, irrigate adequately and check sunny edges for early yellowing.
  • In June and July, scout the sunniest areas more often, since that is when Ohio lawns see numbers climb.
  • When renovating or overseeding, consider perennial ryegrass, fine fescue, or endophyte-enhanced tall fescue for their high resistance.

On St. Augustinegrass in California, resistant varieties such as Floralawn, Floratam and FX-10 are the recommended planting choices.

Common Questions

What Do Chinch Bug Eggs Look Like?

The eggs are bean-shaped and tiny, about 0.84 mm long by 0.25 mm wide, with one end roundly pointed and the other blunt. They are laid in leaf sheaths, thatch and soft soil, so you will rarely see them without a magnifier.

How Many Eggs Can a Chinch Bug Lay?

In the Southeast, a female can lay up to 250 eggs in her lifetime. That rate explains why a small, unnoticed group can turn into a spreading patch once the weather turns hot and dry.

Will Grass Grow Back After Chinch Bugs?

Grass that was killed will not recover on its own, though lightly yellowed turf at the edge of a patch can bounce back once the insects are gone and the lawn is watered. Plan on reseeding or patching the brown center after the infestation is cleared.
Black Turfgrass Ataenius: How to Spot Them and Get Rid of Them

Black Turfgrass Ataenius: How to Spot Them and Get Rid of Them

Irregular brown patches that look thirsty even though the sprinklers run can signal black turfgrass ataenius in a lawn. The culprit is a small beetle whose grubs feed on grass roots. Knowing what the grub and the adult look like, and when they work, makes the fix straightforward.

Signs of Black Turfgrass Ataenius in a Lawn

Black Turfgrass Ataenius: How to Spot Them and Get Rid of Them

Start with the grub itself, because the roots tell the story before the grass leaves do.

  • Digging around the roots turns up whitish, C-shaped grubs with 6 legs and reddish heads, up to 1/3 inch long.
  • The turf pulls up easily in irregular dead patches, because the larvae have eaten the roots that held it down.
  • The affected grass looks drought stressed, even where irrigation is sufficient.
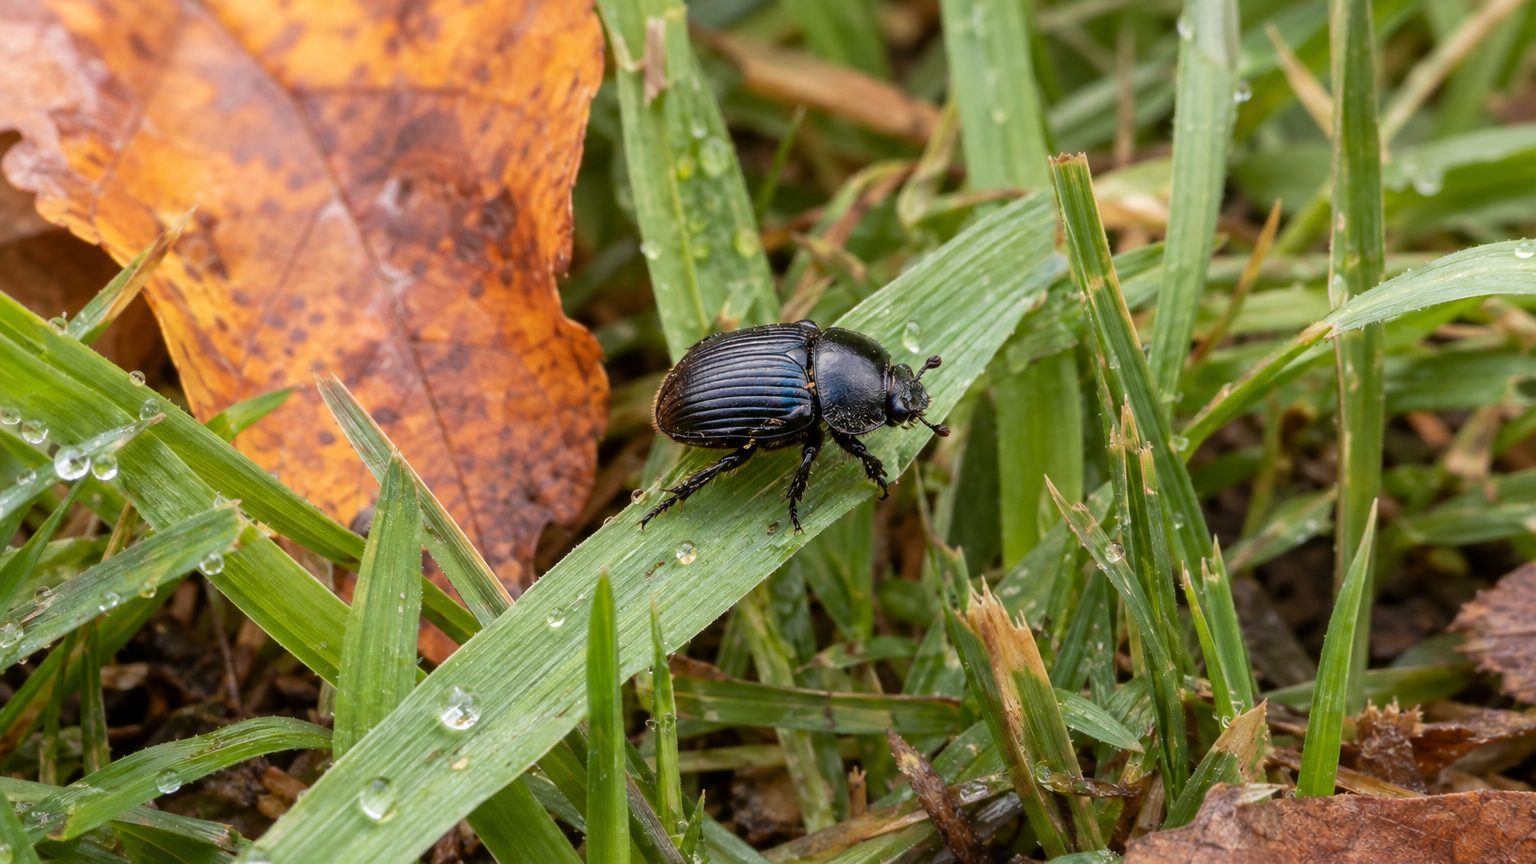
  • Adult beetles are shiny jet black, about 1/5 inch long, with parallel grooves on the wing covers.
  • According to UC IPM, University of California, adults stay continuously active during the warm months in inland areas.

Pairing the thirsty look with grubs in the soil is what settles the diagnosis.

Lawn Damage Mistaken for Black Turfgrass Ataenius

Several lawn problems produce the same dull, dying patches. The difference lies underground and in how the turf responds to water.

Because the grubs are so small, a quick glance at the soil can miss them. Dig along the edge of a patch, where living and dying grass meet.

Looks like How to tell them apart
Plain drought stress Grass revives after a deep watering and roots are intact. With ataenius, the patch stays stressed despite enough irrigation, and the roots are chewed with grubs in the soil.
Larger white grub damage Turf lifts like a carpet, but the grubs are bigger. The damage threshold is 10 to 12 per square foot for the larger species, compared to 50 for ataenius.

Fungal disease can look similar. It shows on the blades, with spots or discolored leaf tissue, while ataenius leaves the leaves intact and works on the roots.

When Black Turfgrass Ataenius Damage Shows Up

The cause is the larval stage. Female adults lay clutches of 11 or 12 eggs, and the grubs that hatch feed on roots, so the damage follows each generation as it grows.

Timing depends on climate. According to UC IPM, University of California, at least two or three generations develop each year, with up to five in the warmest part of the state. Adults stay continuously active during warm months in inland areas, so the grub pressure there can last through the season.

According to UC IPM, University of California, the beetles probably overwinter in reproductive dormancy, so inspect the roots again if damage builds as the weather warms.

How to Get Rid of Black Turfgrass Ataenius

Confirm the grubs first, then match the response to their numbers.

  1. Dig around the roots at the edge of a damaged patch, because that is where whitish, C-shaped grubs with reddish heads show up.
  2. Count the grubs in a square foot of soil, because in California control may be needed only above about 40 per square foot.
  3. Hold off on treatment if the count is lower, since healthy turf can tolerate a small population.
  4. Schedule irrigations carefully, because in California managing water is one way to help turf withstand low levels of the grubs.
  5. Adjust your mowing practices, since the same California guidance points to mowing changes that help the grass cope.
  6. Ask your state extension office about any product registered locally, because labels and approvals differ from state to state.

If damage returns, sample the soil again to check for grubs.

How to Prevent Black Turfgrass Ataenius

Prevention starts with healthy turf and regular checks for grubs.

  • Sample the soil to look for larval stages.
  • Schedule irrigation carefully so the turf can better withstand low grub levels.
  • Adjust mowing practices so the turf can better withstand low grub levels.
  • Maintain healthy plants with proper cultural practices.
  • When thirsty patches appear despite watering, dig and check the roots before changing your irrigation.

Careful irrigation and mowing can help turf withstand low grub levels.

Common Questions

Do Black Turfgrass Ataenius Grubs Damage Grass as Much as Other White Grubs?

Individually they do less harm, which is why the damage threshold is 50 per square foot, far above the 10 to 12 for larger species. A lawn can carry a fair number before it suffers.

Why Does My Lawn Look Dry When the Sprinklers Are Working?

Roots chewed by grubs cannot take up water, so the grass looks drought stressed even with enough irrigation. Digging up a small section will show whether grubs are the reason.

What Does the Adult Beetle Look Like?

It is shiny jet black, about 0.2 inch long, with parallel grooves on its wing covers. It is small enough to pass for a speck of debris on the turf.

Billbugs in Lawns: How to Spot Them and Get Rid of Them

Billbugs in Lawns: How to Spot Them and Get Rid of Them

Dead patches that turn straw-colored in mid to late summer, even though you have watered, often point to billbug larvae. They feed on the crown and roots, so the damage looks like drought but behaves differently. Spotting the larvae and acting at the right moment keeps a small patch from spreading.

Signs of Billbugs in a Lawn

Billbugs in Lawns: How to Spot Them and Get Rid of Them

A useful sign is a stem that gives way when you pull on it, with other clues building around it.

  • Tugging a stem upward makes it break off at the crown, revealing a hollowed stem packed with sawdust-like excrement.
  • Early damage appears as dead spots about 2-3” in diameter, which can merge into larger patches.
  • Brown or yellow patches are most common and most severe in the mid to late summer.
  • White, legless grubs with a red-brown head capsule sit in the thatch and upper soil, growing from 1/25–1/3 inch (1mm–8mm) in length.
  • Adult weevils, black to red-brown and 1/4–1/2 inch (7–12mm) long, walk across sidewalks and driveways.

Because billbug feeding can hollow the stem, the grass often dies before you see the culprit, so the tug test is worth doing early.

Lawn Damage Mistaken for Billbugs

Drought stress and other grubs both produce brown patches in summer, which is why billbugs often get blamed or missed. Each has its own giveaway, and checking the turf closely keeps you from treating the wrong problem.

Pull a handful of the affected turf and look at what happens to the stems and what lives beneath them.

Looks like How to tell them apart
Drought stress Grass wilts and browns evenly in the dry, sunny areas, and the stems stay intact and solid when tugged, with no sawdust-like debris inside.
Other white grubs Turf lifts like loose carpet because the roots are cut, and the grubs you find have legs, unlike the legless billbug larvae.

Leaf diseases can also leave tan patches, but the leaf blades show spotting or lesions, while billbug damage starts at the crown with stems that snap off cleanly.

When Billbugs Damage Shows Up

The cause is feeding by the larvae, not the adults. The grubs feed on the crown and roots, and the lawn shows damage when the dying grass turns brown. That delay is why the damage seems to arrive suddenly in mid to late summer.

Timing of the insects themselves varies by place. In Pennsylvania, females lay eggs in a hollowed chamber in the grass stem from late April through June, and the larvae hatch in about 7 to 14 days. In Indiana, adult bluegrass billbugs become active in April or May as soil temperatures at the surface warm to about 65°F.

Billbugs are listed as pests of all grasses, so no lawn type is exempt. Dry, stressed turf shows the injury sooner, which is why summer heat makes the patches look worse.

How to Get Rid of Billbugs

Confirm the problem before deciding whether it needs action.

  1. Tug a few stems in the damaged area, so you can see whether they break off at the crown with sawdust-like debris inside.
  2. Dig around the roots and look for whitish, C-shaped, legless grubs with reddish heads.
  3. Count the grubs in a square foot, since in California the suggested treatment threshold is 1 per square foot, while in Indiana densities of 10/ft 2 are not uncommon and most healthy turfgrasses tolerate them.
  4. In Indiana, most healthy turfgrasses can tolerate some larvae without significant damage.
  5. Contact your state extension office if the count is high, because it can tell you which products are approved where you live and the right timing.
  6. Reseed or patch the dead areas once the feeding is under control, so weeds do not move in.

Dead turf will not green up again, so repair comes after control, not before. Healthy grass around the patch can often fill in on its own if the grubs are dealt with.

How to Prevent Billbugs

Prevention is mostly about choosing the right grass and keeping it strong through the season.

  • In Indiana, check lawn edges and driveways for adults walking across hard surfaces in April or May.
  • When seeding or overseeding, choose perennial ryegrass or fescue with endophytes, a fungus that grows within the plant and, in Utah, is noted to reduce billbug feeding and damage.
  • According to Purdue Extension, a stand made up of at least 40% plants with endophytes (E+) is generally recommended for billbug resistance, so aim for that mix when renovating.
  • In Pennsylvania, scout by tugging stems from late April through June, when eggs are laid.
  • In midsummer, water deeply during dry spells so stressed turf does not show damage sooner.

A thick, healthy lawn tolerates feeding better than a thin one, so good turf care offers useful long-term protection.

Common Questions

Do Billbugs Only Attack Kentucky Bluegrass?

No. Billbugs are listed as pests of all grasses, though some lawns show damage more than others depending on stress and how thick the turf is.

How Big Are Billbug Grubs?

Mature third-instar larvae are approximately 1/4 to 3/8 inch long, white with a brown head capsule and no legs, so you may need to look closely in the soil.

Will My Lawn Recover from Billbug Damage?

In Indiana, healthy turf may tolerate billbug larvae without significant damage, but dead patches still need repair after the grubs are controlled.

Armyworms in Lawns: How to Spot Them and Get Rid of Them

Armyworms in Lawns: How to Spot Them and Get Rid of Them

Brown, ragged patches that spread quickly, with birds working the turf, often point to armyworms. These caterpillars chew grass blades and travel in groups, so a lawn can go from green to scorched very quickly. Knowing what they look like and when they hit makes the response far calmer.

Signs of Armyworms in a Lawn

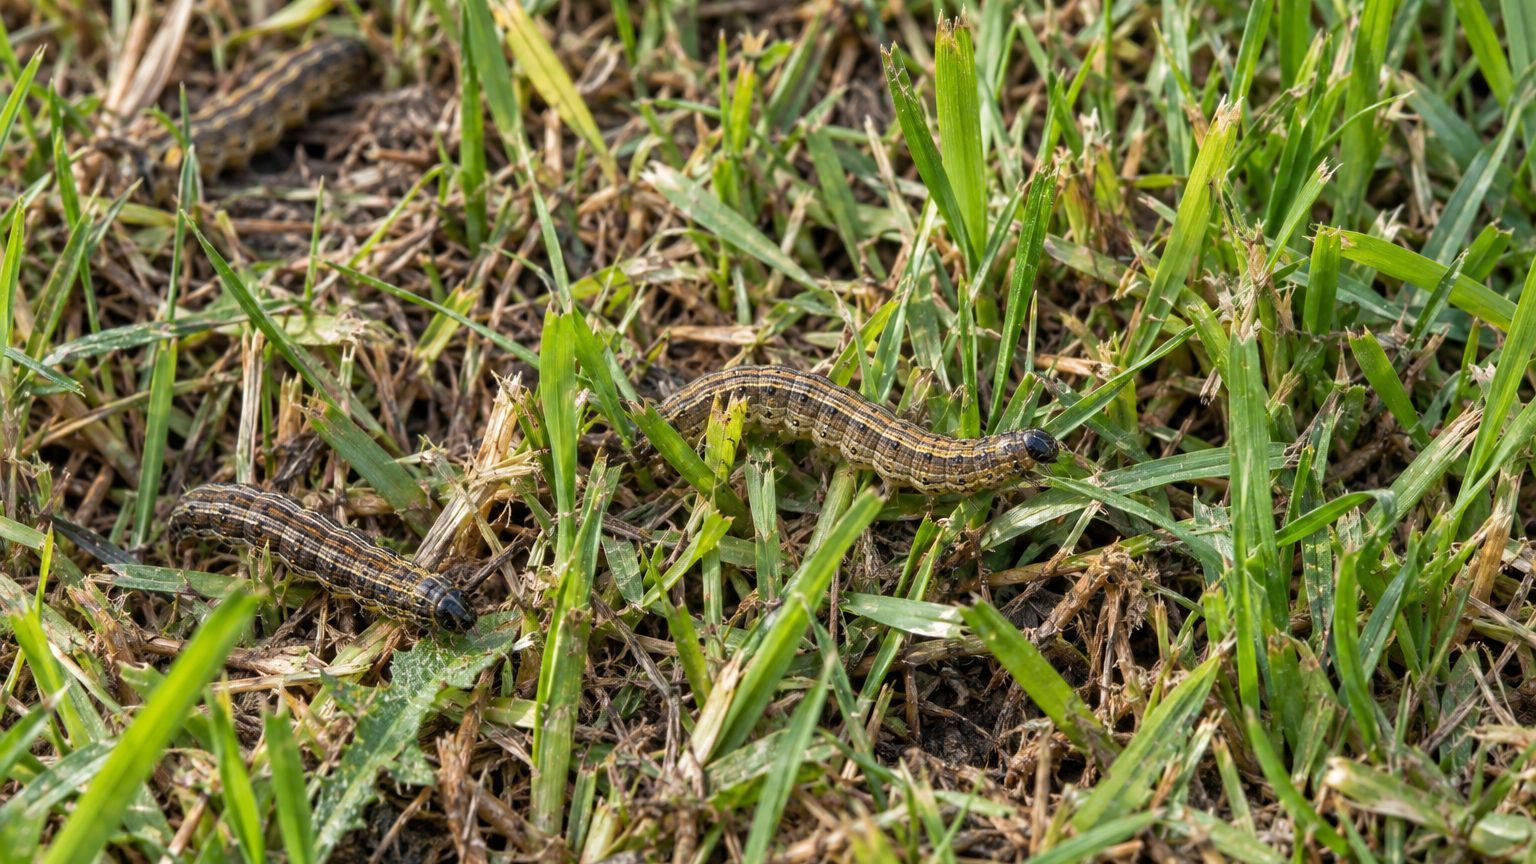
Armyworms on a lawn

Armyworm damage shows up as a mix of chewed grass and small caterpillars hiding in the turf, so check the lawn closely.

  • Birds gather on the lawn to feed, and their presence often signals a heavy infestation.
  • Irregular brown patches appear and grow quickly when large masses of caterpillars are feeding together.
  • Grass blades look skeletonized or have chewed margins, because young caterpillars feed at night.
  • True armyworm larvae feed for 3-4 weeks and reach about 35 mm in length.
  • Moths flying around the yard are a warning, with true armyworm adults reddish-brown and marked with a white dot on each wing, while fall armyworm adults are ash-gray.

Finding brown patches along with feeding birds is a good reason to scout the turf.

Lawn Damage Mistaken for Armyworms

Brown patches have many causes, and several look like caterpillar feeding from the sidewalk. A quick check of the grass blades and the thatch usually sorts them out.

Armyworms leave chewed blades and live caterpillars near the soil surface, while the roots stay firmly in place.

Looks like How to tell them apart
Cutworm damage Small, sunken patches with chewed blades, found along with caterpillars that curl up in the thatch, though cutworms are usually fewer and more scattered.
Drought stress Grass turns dull and straw-colored in broad areas, blades stay whole with no chewing, and no caterpillars appear when you flush the thatch with soapy water.

Grubs can also cause brown turf, but they feed on roots, so the sod lifts like a loose carpet. Armyworms are described as leaving roots and the crown undamaged, which distinguishes them from root-feeding grubs.

When Armyworms Damage Shows Up

Damage follows the life cycle. Eggs hatch into larvae that feed on the leaves, and the feeding is heaviest as the caterpillars grow large. Once they finish, they burrow into the thatch and soil to pupate, then emerge as moths that lay the next round of eggs.

The gap between pupation and new adults varies by place. In Texas, adults emerge 10-14 days later, in South Carolina the larvae pupate in the thatch and soil and emerge 10 to 20 days later, and in Utah adults emerge in 2-3 weeks. In warm climates, that quick turnaround means new waves can follow one another.

Turf type matters too. Armyworms feed on most cool-season and warm-season grasses, and they like well-fertilized, well-kept bermudagrass, which is the most common host. They are also fond of cool-season turf, and they feed and migrate in large groups, so damage can appear suddenly in part of the lawn and spread across the yard.

How to Get Rid of Armyworms

Treatment starts with confirming the caterpillars are there and counting them.

  1. Mix a soap flush, using 2 tablespoons of liquid dishwashing soap in 1 gallon of water (the Alabama recipe), so hidden larvae come up to the surface where you can see them.
  2. Pour it over a patch of lawn and watch the surface for 5-8 minutes, which is the time Utah guidance gives for caterpillars to surface.
  3. Count the larvae in several spots at the edge of the damage, because that is where they are actively feeding.
  4. Compare your count with the threshold, which in Utah is 10-15 larvae per square yard with obvious damage, and treat only if the numbers and the damage both justify it.
  5. Water and fertilize as usual if the count is low, since in Utah healthy turfgrass can tolerate low to moderate infestations when it is properly irrigated and fertilized.
  6. Call your state extension office before buying any insecticide, and if you do use a contact product, hold off on watering, because in South Carolina the advice is to avoid irrigation or rainfall for 24 hours after application.

Because these caterpillars do not damage roots or crowns, Utah guidance notes that turfgrass can usually recover over time without an insecticide treatment. Brown patches that look bad now often green up again.

How to Prevent Armyworms

Prevention is mostly about keeping turf strong and checking it when moths are active.

  • Properly irrigated and fertilized turfgrass can tolerate low to moderate infestations.
  • Walk the lawn regularly and watch for moths or birds feeding on the turf.
  • When moths appear in the yard, do a soap flush on a small area to catch caterpillars before patches form.
  • Keep checking the edges of any brown spots for feeding larvae.
  • After damage appears, follow local watering and mowing guidance while the grass recovers.

Avoid overfeeding bermudagrass with nitrogen, since lush, well-fertilized turf is what these caterpillars prefer.

Common Questions

Will Grass Grow Back After Armyworms?

Usually yes. Turfgrass can recover over time because armyworms leave the roots and crown undamaged.

What Time of Day Should You Look for Armyworms?

Young caterpillars feed at night, and a soap flush can bring larvae from the thatch to the surface.

Do Birds on the Lawn Mean Armyworms?

Often, since birds are drawn to armyworms and cutworms, and heavy bird activity can indicate a bad infestation. Confirm with a soap flush before you act.

Whiteflies on Hydrangeas: How to Spot Them and Get Rid of Them

Whiteflies on Hydrangeas: How to Spot Them and Get Rid of Them

Whiteflies on hydrangeas show up as tiny white insects that flutter off the leaf undersides when you brush a branch, leaving sticky, shiny leaves behind. A firm water spray on the undersides, repeated as adults return, handles most yards. Treatment is the same for every hydrangea type, but the pruning that follows is not, so check your type and state page first.

Whiteflies: What You See

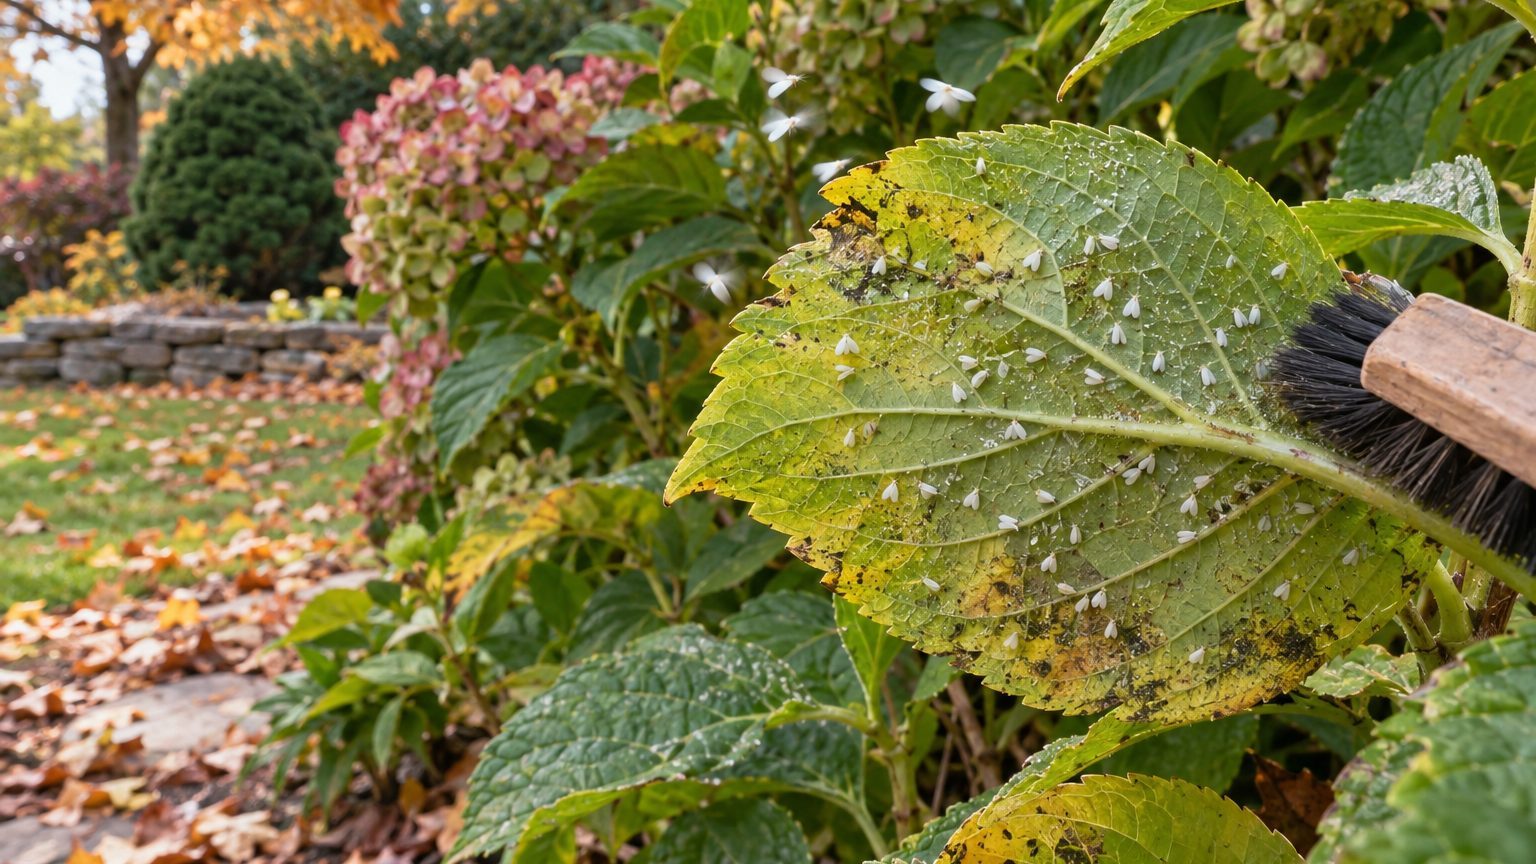
Whiteflies on a hydrangea

The NC State Extension Gardener Plant Toolbox lists aphids, scales, nematodes and mites as hydrangea pests, all “rarely a problem,” and does not name whiteflies, so this sheet sticks to what your eye can confirm.

  • Tiny white, moth-like insects, smaller than a gnat, resting on the undersides of leaves.
  • A cloud of white flakes that lifts when you brush or shake a branch, then settles again.
  • Pale, flat, oval specks that do not move, clustered close to the leaf veins.
  • A shiny, sticky film on the leaves below, sometimes followed by a black, sooty coating.
  • Leaves that turn yellow and speckled during warm weather.

The largest species has its own sheet at Giant Whitefly on Hydrangeas, and the wider list of trouble sits under Hydrangea Pests.

Whiteflies or Something Else?

Three insects get mistaken for whiteflies, and the extension source names all three as hydrangea pests. One shake of the branch and one look at the leaf underside sorts them out.

A hand lens helps if you own one. Without it, your fingernail and a sheet of white paper do most of the work.

Looks like The sign that tells them apart
Aphids: small soft insects clustered on new growth They stay put or crawl when you shake the stem, and nothing flies up in a cloud
Mites: pale speckling across the leaf surface Fine webbing on the underside, with no flying insects at all
Scales: small bumps on stems and leaf veins The bumps never move, and a fingernail flicks them off as a hard shell

Nematodes work underground, and deer leave torn leaves and browsed tips, so neither mimics a white cloud. Aphids get a full sheet at Aphids on Hydrangeas, and the other kinds are on their own pages.

What Causes Whiteflies, and Where It Is Worst

Whiteflies feed on leaf sap and multiply through warm weather, and since the NC State Extension Gardener Plant Toolbox puts hydrangeas at USDA zones 3a through 9b without mapping whiteflies, the split below follows the types you grow, not an invented infestation chart.

  • Great Lakes and the North (Michigan, Minnesota, Wisconsin): panicle and smooth, the hardiest types, dominate, so check the undersides during the warmest stretches.
  • Northeast and Mid-Atlantic (New York, Pennsylvania, Virginia): bigleaf reaches its northern limit at USDA 6a, so look hardest at sheltered, shaded plantings.
  • The South (Georgia, Texas, the Carolinas): bigleaf, oakleaf and panicle share a long warm season, which gives any pest more time to build.
  • West and Mountain (California, Oregon, Colorado): irrigated beds and walls hold warmth, so scout the plants tucked against them.

Your state page carries the pruning window and zone verdict for your type, which this national sheet leaves out on purpose.

How to Treat Whiteflies

Start this week, and work in this order, because the first two steps cost nothing and often solve the problem.

  1. Confirm with a shake: tap a branch over white paper, and if white flakes lift and settle back, you have adults to deal with.
  2. Rinse the undersides: use a firm spray from the hose in the morning, aimed upward, so the leaves dry before evening.
  3. Bag the worst leaves: remove heavily coated ones and put them in the trash, not the compost pile.
  4. Repeat the rinse each time adults return: a single pass leaves eggs behind, and the next wave hatches after you have stopped looking.
  5. Hang yellow sticky cards nearby: they show you when adults are flying, and they tell you when to rinse again.
  6. Ask your state extension service: only they know which products are registered where you live, so I name none here.

Keep the shears in the shed while you fight them. Pruning timing depends on type, and a bigleaf cut in spring loses its flowers because its buds form the previous summer.

How to Prevent Whiteflies Coming Back

Prevention here follows the year, from the nursery bench through the winter cleanup.

  • Before you buy: flip a few leaves on any new plant and keep it apart from your others for a while.
  • Spring and early summer: check the undersides on a regular schedule so you catch the first adults, not the tenth generation.
  • Summer dry spells: water at the base and mulch, because bigleaf and panicle are both shallow-rooted, and dry leaves also cut the risk of leaf spot and powdery mildew.
  • Fall: rake fallen leaves from under the plant, and when you tidy dead hollow stems, the NC State Extension Gardener Plant Toolbox says to cut them back to 12-24 inches and leave them standing for native bees.
  • Late winter: panicle and smooth types can take a hard cutback, while bigleaf, mountain, oakleaf and climbing types wait.

Deer browsing stresses plants too, so a fence pays off twice.

Where this comes from

This sheet leans on the NC State Extension Gardener Plant Toolbox entry for Hydrangea, which names the pests and diseases above and does not list whiteflies. Confirm what is registered and timely for your yard with your state’s cooperative extension service before you treat.

Common questions

Do whiteflies kill hydrangeas?

The extension source calls hydrangea pests rarely a problem. Whiteflies drain sap and coat leaves with sticky residue, so a healthy established plant usually tolerates light numbers. Act when you see clouds lifting from the branches.

Does treatment change by hydrangea type?

The rinse-and-repeat routine stays the same for all of them. What changes is pruning, hardiness and flowering wood, so look up your type and your state page before you cut anything.

Is bigleaf hydrangea safe around pets while I treat it?

Only bigleaf is documented as toxic, and only when large quantities are eaten, with nausea, stomach pain and vomiting. It affects cats, dogs and horses. Keep animals from chewing on it, and there is no need for alarm.

Spider Mites on Hydrangeas: How to Spot Them and Get Rid of Them

Spider Mites on Hydrangeas: How to Spot Them and Get Rid of Them

Spider mites on hydrangeas show up as fine pale stippling on the leaves, a dull bronze cast, and silk on the underside, most often in hot, dry weather. The animals are smaller than a poppy seed, so you see the damage first. A firm jet of water, repeated, deals with most cases before anything stronger is needed.

Spider Mites: What You See

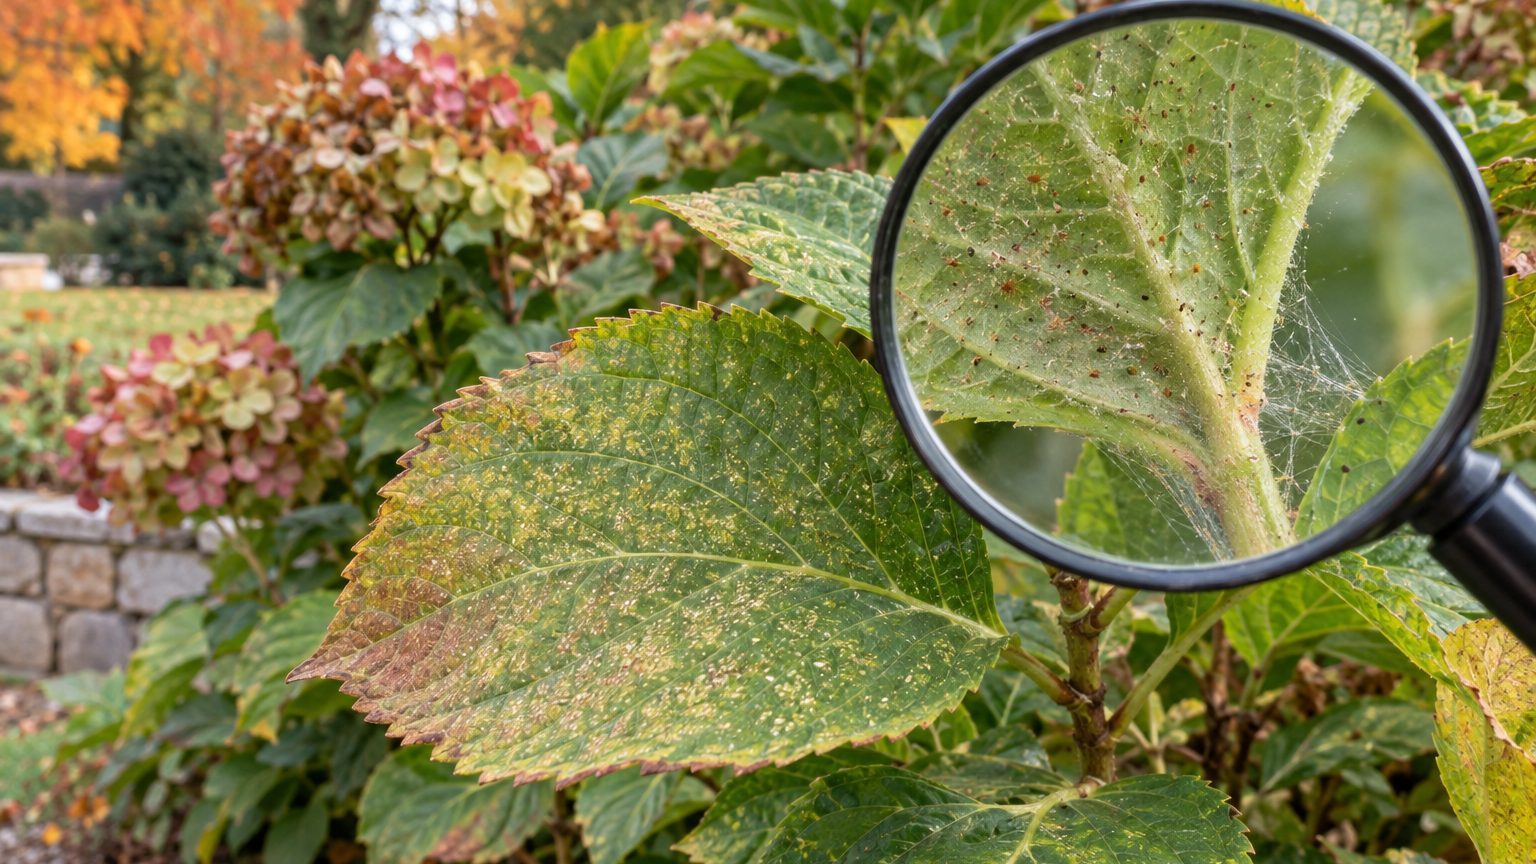
Spider Mites on a hydrangea

NC State Extension Gardener Plant Toolbox names mites among hydrangea pests, and the spider kind announces itself on the leaf long before you spot the animal.

  • Tiny pale specks scattered across the leaf surface, as if pricked with a fine pin.
  • Leaves that turn dull, bronze or gray-yellow instead of glossy green.
  • Fine silk webbing on the underside of leaves and where the leaf meets the stem.
  • Moving specks, red, tan or green, on the underside, smaller than a poppy seed.
  • Damage that builds in hot, dry summer weather, then leaves curling and dropping late in the season.

Tap a branch over a sheet of white paper. Specks that crawl are your answer.

Spider Mites or Something Else?

NC State Extension Gardener Plant Toolbox lists powdery mildew and leaf spot among hydrangea diseases, and aphids among the pests. Each can leave a leaf looking tired, so a quick test saves you from treating the wrong problem.

Mites do not chew. Torn, ragged shoots and missing tips point to browsing, which is covered on Deer on Hydrangeas.

Kind Looks like The sign that tells them apart
Powdery mildew Grayish-white, dusty leaves A white film that wipes off under your thumb, with no silk underneath
Leaf spot Speckled, blotchy leaves Spots with a defined edge, and nothing moves when you tap a branch over white paper
Aphids Distorted, sticky new growth Clusters of soft insects on shoot tips, with sticky residue on the leaves below

Other sap-feeders have their own pages, including Whiteflies on Hydrangeas. If nothing on the table fits and the paper test shows moving specks, you have mites.

What Causes Spider Mites, and Where It Is Worst

NC State Extension Gardener Plant Toolbox lists mites as “rarely a problem”, so the cause is usually the season and not the plant: hot, dry, dusty stretches and roots short of water let a small population explode.

  • Great Lakes and the North (Michigan, Minnesota, Wisconsin): panicle, listed at 3a to 8b, and smooth carry the region, and trouble comes in a dry midsummer spell, not a cool wet year.
  • The South (Georgia, Texas, the Carolinas): long hot summers stress bigleaf most, especially in the afternoon sun it is meant to be protected from.
  • Dry West and Plains (Colorado, Kansas, Nevada): low humidity and blowing dust favor mites, and shallow-rooted bigleaf and panicle dry out fast.
  • Pacific Northwest (Oregon, Washington): cool and damp most of the year, so problems wait for a late-summer dry spell.

Your state’s page carries the local timing, and Hydrangea Pests sets mites beside the other pests on the list.

How to Treat Spider Mites

Start with the cheapest tools and work up, and do it this week while the population is still small.

  1. Confirm with white paper: tap a branch over it and look for specks that crawl, since dust and mildew do not move.
  2. Rinse the undersides hard: NC State Extension Gardener Plant Toolbox puts bigleaf at 3 to 6 feet tall and wide, so a hose reaches most of the leaf undersides in the morning.
  3. Bag the worst leaves: pick off the heaviest webbing and put it in the trash, not the compost pile.
  4. Water deeply and mulch: bigleaf and panicle are shallow-rooted and both benefit from mulch, which keeps the soil evenly moist.
  5. Rinse again every few days: mites rebuild fast in heat, so recheck the undersides each time.
  6. Call your extension office before buying a spray: only your state’s extension service knows what is registered where you garden.

Do not prune to chase mites. Bigleaf flowers on last year’s wood, so a spring cut removes the flowers, while panicle flowers on the current season’s growth and tolerates a hard cut in late winter.

How to Prevent Spider Mites Coming Back

Prevention follows the calendar, and most of it is water and housekeeping.

  • Late winter: cut panicle back hard, since it flowers on new growth, and leave bigleaf alone.
  • Spring: lay mulch over the shallow roots so the soil holds moisture through summer.
  • Early summer: start flipping leaves every week or so, before the heat arrives.
  • Dry, hot spells: water deeply at the base and shade bigleaf from afternoon sun.
  • Midsummer: wash dust off the foliage with the hose, because dusty leaves suit mites.
  • Autumn: NC State Extension Gardener Plant Toolbox says to cut hollow stems back to 12 to 24 inches and leave them standing for native bees, which nest in them.
  • After leaf drop: rake up leaves from a plant that had mites and bag them.

The exact dates depend on your zone and hydrangea type, so check your state’s page for the local window.

Where this comes from

NC State Extension Gardener Plant Toolbox names mites among hydrangea pests and calls them rarely a problem. Zone and type change the timing of every task above.

Your state’s extension service has the final word on what is registered and when to act locally. A quick call or a look at their site is worth it before you buy any treatment.

Common questions

Do spider mites kill hydrangeas?

Rarely. The extension entry lists mites as rarely a problem, and a healthy, well-watered plant usually recovers. A heavy, long-running infestation can strip leaves and weaken a stressed plant.

Is a dry, dusty hydrangea more likely to get mites?

Yes. Hot, dry, dusty conditions favor them, and a plant short of water is the easy target. Deep watering, mulch and a rinse of the leaves take away most of that advantage.

Does the same treatment work for every type?

The rinse, the watering and the cleanup are the same across types. Pruning is not: bigleaf flowers on last year’s wood and panicle on the current season’s growth, so cut the two on different schedules.

Scale Insects on Hydrangeas: How to Spot Them and Get Rid of Them

Scale Insects on Hydrangeas: How to Spot Them and Get Rid of Them

Scale insects on hydrangeas look like small, hard bumps stuck to stems and leaf undersides, and they never move. Scrape one with a fingernail to confirm. A few can be rubbed off or pruned out this week. A heavy infestation calls for a spray your state extension service says is registered locally.

Scale Insects: What You See

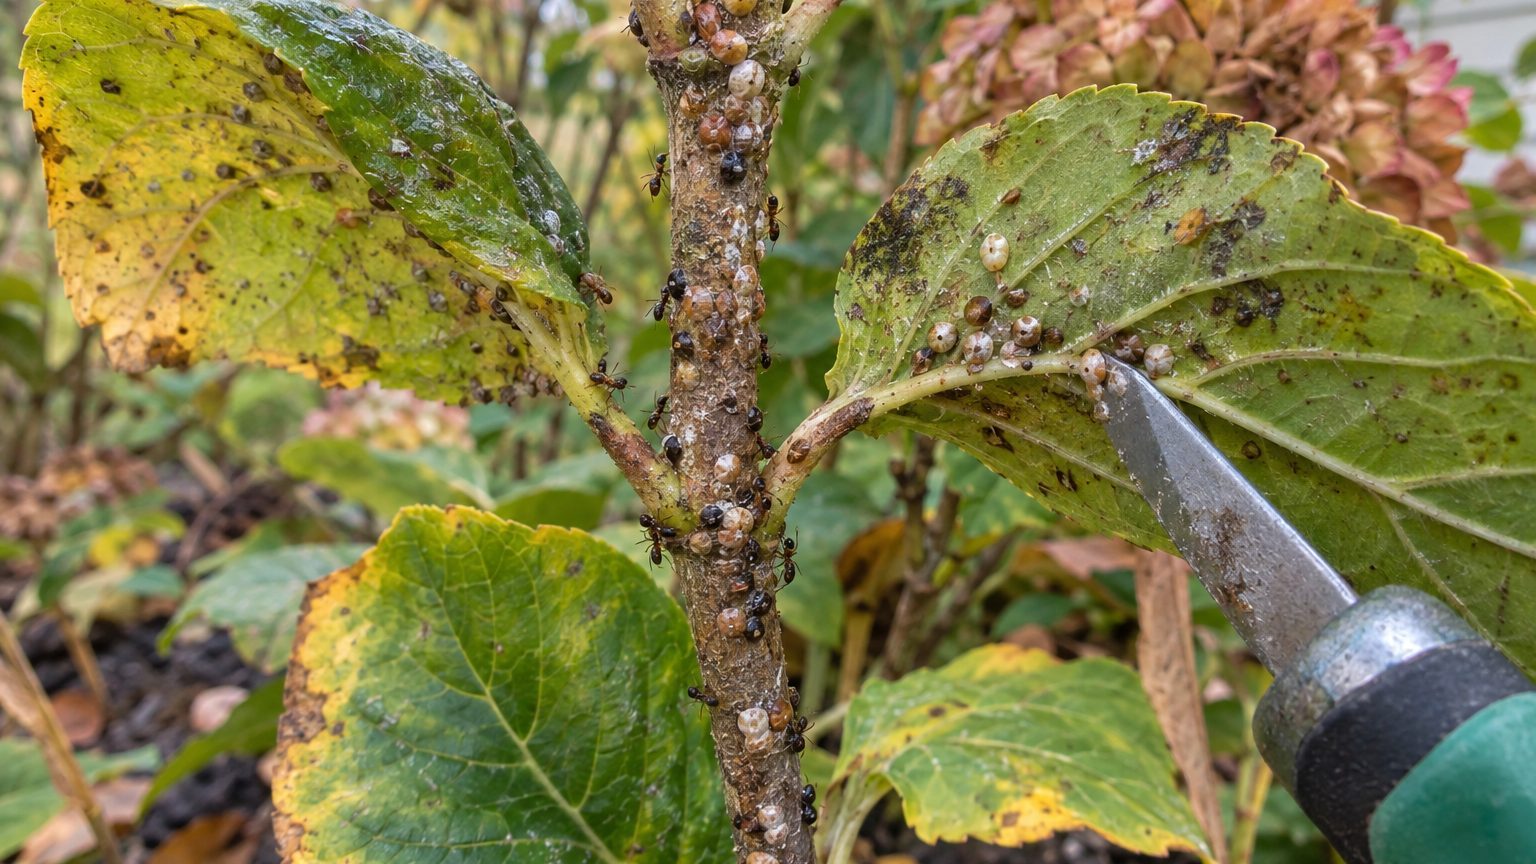
Scale Insects on a hydrangea

The NC State Extension Gardener Plant Toolbox lists scales among hydrangea pests and calls them rarely a problem, so I check for these signs before blaming them:

  • Small bumps on stems, flat or domed, tan, brown or whitish, fixed in place like a scab.
  • More bumps along the veins on the underside of leaves.
  • Sticky, shiny leaves, sometimes with a dark film on top.
  • Ants climbing the stems, drawn by the sticky residue.
  • Weak growth, yellowing leaves or one stem that dies back.

The sticky leaves show in the growing season, while bare winter stems make the bumps easiest to see. Scrape one bump with a fingernail: if it lifts off as a tiny shell, it is scale.

Scale Insects or Something Else?

Several hydrangea troubles get mistaken for scale. The NC State Extension Gardener Plant Toolbox names aphids and mites among the pests and powdery mildew among the diseases, and each gives itself away differently.

Scale sits still and stays attached. Anything that crawls when brushed, spins fine web or rubs away as powder belongs in the table below.

Looks like The sign that tells them apart
Aphids: soft bugs clustered on new growth They are soft-bodied and move when brushed, leaving pale cast skins instead of hard, fixed shells.
Mites: dusty, stippled, faded leaves Fine webbing on leaf undersides, and specks that walk when you tap a leaf over white paper.
Powdery mildew: white patches on leaves The coating wipes off as powder, and nothing hard sits underneath.

The other kinds are on their own pages. Ragged, chewed edges point to Foliage-Feeding Caterpillars on Hydrangeas, mites have Spider Mites on Hydrangeas, and the full list sits at Hydrangea Pests.

What Causes Scale Insects, and Where It Is Worst

Scale insects are sap feeders, and the NC State Extension Gardener Plant Toolbox lists them among hydrangea pests that are rarely a problem in a genus spanning USDA zones 3a through 9b. It publishes no map of hot spots, so I read the type and the stress.

  • Great Lakes and the North (Michigan, Minnesota, Wisconsin): panicle, rated 3a to 8b, and smooth types carry the cold, and winter injury is the strain I would rule out first.
  • The South (Georgia, Texas, the Carolinas): bigleaf is rated 6a to 11b and needs protection from afternoon sun, so a mop-head baking against a hot wall is the plant I would inspect.
  • Mid-Atlantic and Northeast (New York, Pennsylvania, Virginia): oakleaf and mountain types join the mix, both flowering on old wood, and the source ties no scale problem to any of them.
  • The dry interior and West (Colorado, Utah, California): the source accepts soil pH from below 6.0 to above 8.0, so alkaline ground is not the worry, but dry stress on shallow-rooted bigleaf or panicle is.

The page for your state turns these ranges into a verdict for your zone and type.

How to Treat Scale Insects

Start this week with the gentlest step and move up only if the bumps keep coming back.

  1. Confirm with a scrape: a bump that lifts off as a separate shell is scale, while powder or webbing means something else.
  2. Rub off small colonies: a soft brush or a rag clears scattered bumps from a stem without harming the bark.
  3. Cut out crusted stems: prune back to clean wood and bag the cuttings, but on bigleaf, mop-head and lacecap remove only what is heavily coated, because buds formed last summer ride on old wood.
  4. Cut a panicle back hard: it flowers on the current season’s growth, so a late-winter cut removes the infested stems and costs no bloom.
  5. Ask your state extension service: it alone knows which sprays are registered where you live, so follow the label and skip anything it does not list.
  6. Check the same stems again: run a fingernail over them after treatment, since survivors stay put and are easy to find.

I name no product on purpose. Registration varies from state to state, and a spray that is legal in one may not be in the next.

How to Prevent Scale Insects Coming Back

The NC State Extension Gardener Plant Toolbox rates hydrangea maintenance as low, and a few dated habits keep it that way:

  • Winter: go over the bare stems for bumps, when nothing hides them.
  • Late winter: cut panicle back hard, but leave bigleaf alone, since its buds sit on last year’s wood.
  • Spring: lay mulch, because bigleaf and panicle are both shallow-rooted and benefit from it.
  • Summer: shield bigleaf from afternoon sun, since a scorched plant is a stressed one.
  • Growing season: flip a few leaves each time you water and look along the veins.
  • Fall: rake up fallen leaves, then cut dead hollow stems to 12 to 24 inches and leave them standing.

Those standing stems are where native bees nest, so the last step feeds the yard as well.

Where this comes from

The plant descriptions, hardiness ranges and pest list here come from the NC State Extension Gardener Plant Toolbox entry for Hydrangea. That source names scales, aphids, nematodes and mites, and calls them rarely a problem.

How scale looks and behaves is general field knowledge, not a figure from that entry. Before you spray anything, check with your state’s cooperative extension service, which knows what is registered and which types suit your zone.

Common questions

Are scale insects a serious problem for hydrangeas?

Rarely. A handful of bumps is a scrape-and-prune job. A shrub coated from base to tip deserves a call to your county extension office.

Will pruning get rid of scale on my hydrangea?

It removes the stems the insects live on, but timing depends on type. A panicle tolerates a hard late-winter cut, while bigleaf carries next year’s buds on old wood, so cut only what is coated.

Which spray should I use?

I cannot name one, because registration differs by state. Your state cooperative extension service lists what is allowed on ornamentals where you live, and the product label has the final word.

Rose Chafer on Hydrangeas: How to Spot Them and Get Rid of Them

Rose Chafer on Hydrangeas: How to Spot Them and Get Rid of Them

Chewed blooms and ragged leaves on a hydrangea in early summer, with slender tan beetles crowding the flowers, point to rose chafer. Hand-picking in the morning and covering the blooms will get you through a season, and your state extension service can say what is registered locally. For the wider picture, see Hydrangea Pests.

Rose Chafer: What You See

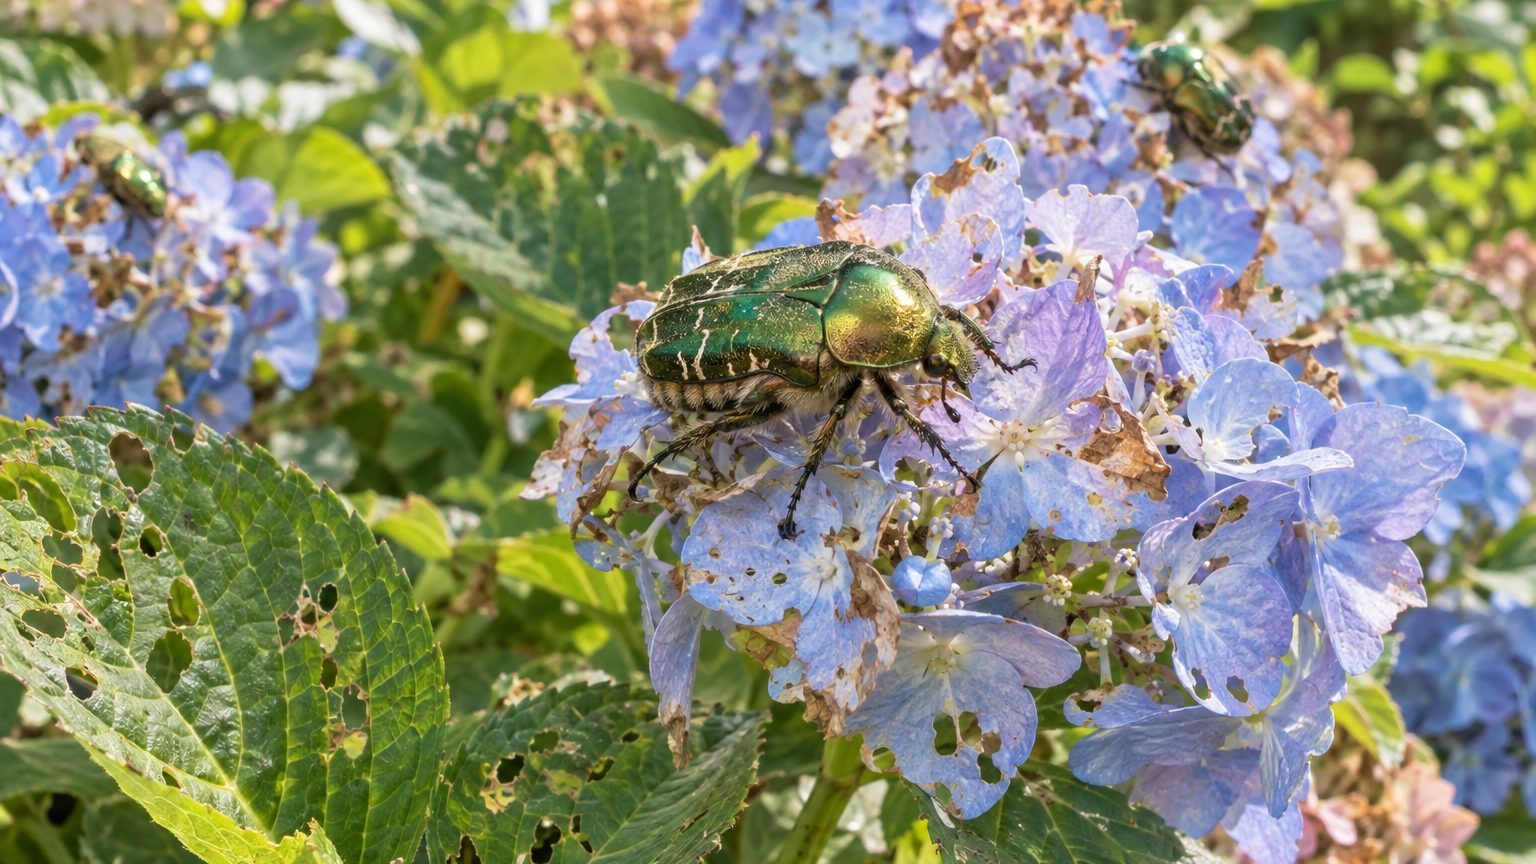
Rose Chafer on a hydrangea

The NC State Extension Gardener Plant Toolbox lists aphids, scales, nematodes and mites for hydrangea and calls them rarely a problem, so rose chafer is something you confirm by eye. Here is what to look for:

  • A slender, pale tan beetle with long, spindly legs, sitting on the flowers.
  • Petals and sepals full of ragged holes, blooms browning before they should.
  • Leaves chewed into lace, with the veins left standing.
  • Several beetles on one flower head, dropping or flying off when you jostle the shrub.
  • Damage that shows up when the blooms open, not before.

Exact timing shifts from state to state, so watch your own shrub rather than a calendar page.

Rose Chafer or Something Else?

Chewed hydrangeas rarely come with a name tag. Several other visitors leave holes, sticky leaves or ragged stems, and the fix differs for each. The NC State Extension Gardener Plant Toolbox names deer among the things that damage hydrangeas, and browsing is what I check for first.

A single sign usually settles it. Look at the insect itself, then at the pattern of the damage.

Looks like The sign that tells them apart
Deer browsing Torn, jagged ends on whole shoots, with no beetles anywhere on the plant.
Scale insects Small bumps stuck to the stems that do not move when you brush them.
Aphids Tiny soft insects packed in clusters on new growth, with sticky leaves below.

Mites and nematodes are also on the source’s list, though neither leaves beetle-style holes. Details are on the pages for Scale Insects on Hydrangeas and Root-Knot Nematodes on Hydrangeas.

What Causes Rose Chafer, and Where It Is Worst

The beetles that chew your blooms grew up underground as grubs, so they tend to come from nearby lawn or loose, sandy beds. The NC State Extension Gardener Plant Toolbox puts panicle hydrangea at USDA 3a to 8b and bigleaf at 6a to 11b, and it does not map this beetle.

  • Great Lakes and the North (Michigan, Minnesota, Wisconsin): panicle and smooth hydrangeas carry the load here, and sandy lawn soil is worth checking first.
  • The Mid-Atlantic and Ohio Valley (Pennsylvania, New Jersey, Ohio): bigleaf and panicle both fit, so mixed plantings can have two blooming windows for beetles to find.
  • The South (Georgia, Texas, the Carolinas): bigleaf, oakleaf and panicle are all grown, and the source accepts clay, loam or sand, so soil type will not protect you.

How heavy the beetle pressure runs in your county is a question for the page for your state and your extension office.

How to Treat Rose Chafer

Start this week with steps that cost nothing and harm nothing else in the bed. Keep in mind which hydrangea type you grow, because that decides how you handle damaged flowers later.

  1. Confirm the beetle: check the shrub at dawn and match what you find against the table above before doing anything else.
  2. Hand-pick into soapy water: go out in the cool morning when they are slow, and repeat daily while they keep arriving.
  3. Cover the flower heads: fine netting or floating row cover over the blooms keeps beetles off, and you can lift it for a look each morning.
  4. Leave the pruning alone: a bigleaf forms its buds the previous summer, so cutting hard now removes next year’s flowers, while a panicle can wait for late winter.
  5. Ask your extension office: only your state service knows which products are registered where you live, and what rate and timing they allow.

I skip product names on purpose. Labels and legal uses vary by state, and a wrong pick can hurt the bees that visit hydrangea blooms.

How to Prevent Rose Chafer Coming Back

Prevention follows the year. A few dated habits leave the beetles less to work with and make the next season easier to read.

  • Late winter: on panicle hydrangeas, cut back hard before growth starts, since they flower on the current season’s growth and recover fast.
  • Early spring: refresh mulch, because bigleaf and panicle are both shallow-rooted and benefit from it.
  • Before bloom: set up netting and start morning checks so you catch the first beetles rather than the fiftieth.
  • After bloom: clip off the chewed flower heads on types that bloom on new wood, and leave old-wood types to their own schedule.
  • Autumn: leave hollow stems standing at 12 to 24 inches, since the NC State Extension Gardener Plant Toolbox notes native bees nest in them until they break down.

None of this removes grubs from a neighbor’s lawn, but it keeps your own shrubs from becoming the easiest meal on the block.

Where this comes from

The beetle notes are field guidance and should be checked.

Before you buy anything or change a routine, confirm with your state’s cooperative extension service. They know your local beetle timing and what is legal to use.

Common questions

Will rose chafer kill my hydrangea?

The damage I see described is mostly to flowers and foliage, not the whole plant. Even so, a heavily chewed shrub is a good reason to start morning checks and netting right away.

Are the beetles or my hydrangea dangerous to pets?

Only bigleaf hydrangea is documented as toxic, and only when large quantities are eaten. Dogs, cats and horses can be affected, with nausea, vomiting and sweating. Keep soapy pick-up jars out of reach too.

Should I cut off chewed flowers right now?

It depends on the type. Bigleaf sets buds on last year’s wood, so a heavy cut takes next year’s blooms. Panicle and smooth flower on new wood and tolerate more, but check your state page for timing.

Root-Knot Nematodes: How to Spot Them and Get Rid of Them

Root-Knot Nematodes: How to Spot Them and Get Rid of Them

Root-knot nematodes are microscopic worms that live in soil and feed on roots. On a hydrangea they leave one signature you can check with a trowel: knotted swellings along the fine roots. They are among the less common hydrangea troubles, so confirm before you spend money. Dig one plant and look, because the leaves alone can mislead you.

Root-Knot Nematodes: What You See

Root-Knot Nematodes on a hydrangea

The worms feed inside the root and choke off water and nutrients, so the signs above ground read as thirst. NC State Extension Gardener Plant Toolbox lists nematodes among hydrangea pests and calls them rarely a problem, so slow, careful looking beats alarm.

  • Knots on the roots: firm, rounded swellings along the fine roots that stay fixed when you rub them.
  • Pale, yellowing leaves that never quite green up, even after feeding.
  • Stunted growth, with fewer and smaller shoots than a healthy plant of the same type nearby.
  • Leaves that droop in afternoon heat while the soil below is still moist.
  • A patchy pattern, with one corner of the bed declining and the rest holding steady.
  • Symptoms that sharpen in the warm months, when the plant asks the most of its roots.

No single sign proves anything. Knots plus a patchy decline make a strong case for sending a sample to your state lab.

Root-Knot Nematodes or Something Else?

Yellow leaves and wilting have a dozen causes, and most of them have nothing to do with worms. NC State Extension Gardener Plant Toolbox names bacterial wilt and leaf spot among hydrangea diseases, and it says bigleaf should be protected from afternoon sun.

So the leaves are a poor witness. The roots decide, and one quick dig sorts out most of the confusion.

Looks like The sign that tells them apart
Bacterial wilt The roots are free of knots. Look for wilting that spreads through the plant instead of staying in one patch of the bed.
Leaf spot Spots mark the leaf blades themselves, and the roots come up clean and pale when you dig.
Afternoon sun stress on bigleaf Leaves recover by evening or after shade is added, and the roots show no swellings.

Chewing damage is another story, and it has its own pages: Foliage-Feeding Caterpillars on Hydrangeas and Rose Chafer on Hydrangeas. Nematodes never chew a leaf.

What Causes Root-Knot Nematodes, and Where It Is Worst

The cause is a soil-dwelling roundworm that enters young roots and triggers the swellings. NC State Extension Gardener Plant Toolbox rates panicle at USDA 3a to 8b and bigleaf at 6a to 11b, and it lists nematodes as rarely a problem without drawing any map.

  • Great Lakes and the North (Michigan, Minnesota, Wisconsin): panicle and smooth are the usual choices, and sandy patches in a bed deserve a root check first.
  • The South (Georgia, Texas, the Carolinas): bigleaf and oakleaf grow here, and warm soil is where these worms are generally most active.
  • Mid-Atlantic and Midwest (Virginia, Ohio, Pennsylvania): types overlap, so a root check matters more than a regional guess.

Your zone and hydrangea type set the rest of the answer, and your state page carries them. The Hydrangea Pests page sets nematodes beside the other pests the source names.

How to Treat Root-Knot Nematodes

NC State Extension Gardener Plant Toolbox puts hydrangea maintenance at low, and the response here should stay just as measured: confirm first, then act.

  1. Dig one plant, not the bed: lift a small shovel of soil near the edge of the root zone and rinse a few fine roots.
  2. Send a sample to your state lab: your county extension office can tell you how to bag it and where it goes.
  3. Water evenly at the base: the source accepts occasional wet soil but wants good drainage, so avoid both soaking and drought.
  4. Remove plants past saving: bag the roots and the soil around them, and keep them out of the compost pile.
  5. Ask about registered products: only your state extension service knows what is approved where you live.
  6. Hold off on replanting: leave that hole alone until extension tells you what to do next.

Skip the garden-center shelf for now. Registered products differ from state to state, and a wrong guess costs a season.

How to Prevent Root-Knot Nematodes Coming Back

NC State Extension Gardener Plant Toolbox notes that bigleaf and panicle are both shallow-rooted and benefit from mulch, which shapes most of the prevention below.

  • Dormancy: inspect the roots of anything you lift or divide, since this is the one calm window to see them.
  • Planting: slide the plant out of its pot and check the fine roots for knots before it goes in the ground.
  • Spring: lay mulch over the shallow root zone to hold moisture steady as growth starts.
  • Summer: water at the base, and give bigleaf shade from the afternoon sun.
  • Propagation: take stem cuttings or layers only from plants with healthy roots.
  • Fall: clean your tools and clear debris after working around a suspect plant.

None of it takes much time, and every step also helps against the diseases the source names.

Where this comes from

NC State Extension Gardener Plant Toolbox names nematodes among hydrangea pests and calls them rarely a problem.

Confirm any diagnosis and any treatment with your state’s extension service before you act. It alone knows what is registered where you garden.

Common questions

Are root-knot nematodes common on hydrangeas?

The source lists nematodes among hydrangea pests but calls them rarely a problem. Check the roots before you blame them.

Does a wilting hydrangea mean nematodes?

Not by itself. Afternoon sun on bigleaf and bacterial wilt both cause wilting. Knots on the fine roots are the sign that separates nematodes from the rest.

Does my hydrangea type change the answer?

The root check is the same for every type. Hardiness, pruning and flowering differ a lot by type, so read your state page for your zone.

Hydrangea Leaftier on Hydrangeas: How to Spot Them and Get Rid of Them

Hydrangea Leaftier on Hydrangeas: How to Spot Them and Get Rid of Them

A hydrangea leaftier shows up as leaves pulled together with silk and folded into a small shelter, with something feeding inside. Open one and you have your answer. Treatment is mostly by hand, and it starts with knowing which hydrangea type you grow. One caution up front: the extension source behind this series does not list a leaftier, so I stick to what you can see and check.

Hydrangea Leaftier: What You See

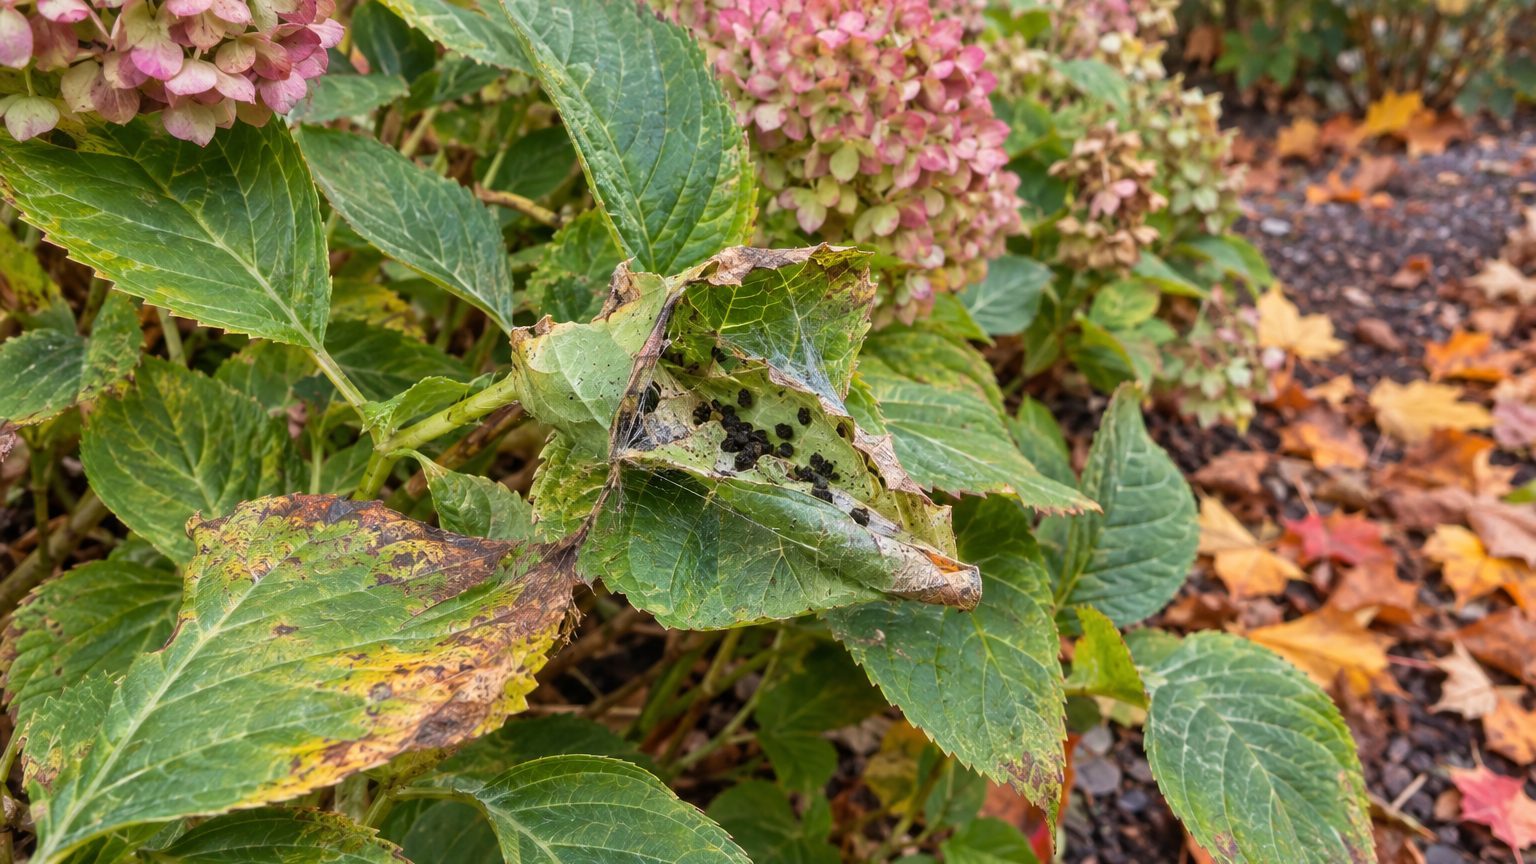
Hydrangea Leaftier on a hydrangea

The NC State Extension Gardener Plant Toolbox lists aphids, scales, nematodes and mites for hydrangea, calls them rarely a problem, and names no leaftier, so identification rests on signs you can check on the leaf itself.

  • Two or more leaves drawn together and held shut with fine silk threads.
  • A single leaf folded over on itself, its edges stuck down like a pocket.
  • Ragged chewing inside the folded shelter rather than along the outer leaf edge.
  • Small dark specks of droppings tucked into the fold.
  • A caterpillar that wriggles when you pry the leaves apart.
  • Browning, curled foliage on the outside of a tied cluster as the season goes on.

All of this appears while the plant is in leaf, so a walk around the shrub in late September still turns it up. Open one tied cluster gently before you decide anything.

Hydrangea Leaftier or Something Else?

Ragged leaves on a hydrangea do not always mean a caterpillar. The NC State Extension Gardener Plant Toolbox lists deer as a damage agent, along with leaf spot and mites, and each of those can pass for leaftier damage from ten feet away.

The tell is always the same: silk that holds leaves together. If nothing is stuck, folded or webbed shut, you are probably looking at one of these three.

Looks like The sign that tells them apart
Deer browsing: torn, uneven leaves and stems Torn edges, no silk anywhere, and leaves that stay flat instead of folding shut.
Leaf spot: brown patches on the foliage The spots sit on a flat leaf surface, and no leaves are stuck together.
Mites: dull, speckled foliage Fine stippling across the leaf with no folded shelter to open.

Other insects that chew hydrangeas have their own pages, starting from Hydrangea Pests, including Rose Chafer on Hydrangeas and Giant Whitefly on Hydrangeas.

What Causes Hydrangea Leaftier, and Where It Is Worst

The cause is a small moth caterpillar that ties leaves with silk so it can feed out of sight. No source I trust maps where it is worst, so I sort by what does change with your region: the hydrangea types you can grow.

  • Great Lakes and the North (Michigan, Minnesota, Wisconsin): panicle and smooth types carry the load here, and the NC State Extension Gardener Plant Toolbox rates panicle at USDA 3a to 8b.
  • The South (Georgia, Texas, the Carolinas): bigleaf is rated 6a to 11b, and it needs protection from afternoon sun.
  • Northeast and Mid-Atlantic (New York, Pennsylvania, Virginia): bigleaf buds form on last year’s wood, so a clean-up of tied leaves must not turn into a stem prune.
  • Mountain West (Colorado, Utah, Montana): panicle is the only hydrangea that takes full sun well, and the source calls it a good substitute for mop-head where that species is not winter hardy.

Your state’s page in this series gives the pruning window and zone verdict for your reference city, so read it before you cut anything.

How to Treat Hydrangea Leaftier

Work in this order this week, and stop short of anything that needs a product label.

  1. Confirm your type: the NC State Extension Gardener Plant Toolbox says bigleaf flowers on last year’s wood and panicle on the current season’s growth, so what you cut matters.
  2. Open one tied cluster: look for the caterpillar, and rule out deer, leaf spot and mites first.
  3. Remove tied leaves by hand: take the leaf, not the stem, so next year’s buds on old wood stay put.
  4. Bag what you remove: seal it for the trash rather than the compost pile.
  5. Recheck in a week: fresh silk on new leaves means a caterpillar is still feeding.
  6. Call your state extension office: only it knows which products are registered in your state for your hydrangea type.

Skip any spray until that call is made. Hand removal costs nothing, and the source rates hydrangea maintenance as low, so a light touch fits the plant.

How to Prevent Hydrangea Leaftier Coming Back

Prevention follows the calendar, and the NC State Extension Gardener Plant Toolbox supplies the timing hooks for each type.

  • Late September: rake up fallen leaves under the shrub and bag them.
  • After leaf drop: pick off any dead leaves still tied to the stems and bin them.
  • Late winter: cut panicle back hard, since it flowers on the current season’s growth.
  • Old-wood types: hold off cutting bigleaf, oakleaf, mountain and climbing until your state page gives the window.
  • Spring: refresh mulch around bigleaf and panicle, both shallow-rooted.
  • Early growing season: walk the shrub weekly and open any leaves that look stuck together.
  • Hollow stems: cut them back to 12 to 24 inches and leave them standing for native bees.

That last step matters more than it looks, because those same stems shelter bees that nest in them until they disintegrate.

Where this comes from

Plant types, hardiness ranges and flowering habits all come from the NC State Extension Gardener Plant Toolbox entry for Hydrangea. It does not name a leaftier, so the signs described here are what you can check on the leaf.

Before you buy or spray anything, take a folded leaf or a photo to your state’s cooperative extension office. They know what is registered where you live, and they can match advice to your zone and hydrangea type.

Common questions

Will a leaftier kill my hydrangea?

Nothing in the extension source says so, and it calls hydrangea pests rarely a problem. A few tied leaves are mostly cosmetic. Keep watching the shrub and act if fresh silk keeps appearing.

Should I prune the damaged stems?

Take the leaf, not the stem. Bigleaf forms buds the previous summer, so a spring prune removes the flowers. Panicle is the exception, since it flowers on current-season growth and can be cut back hard in late winter.

Are the removed leaves safe to handle?

Only bigleaf is documented as toxic, and only if large quantities are eaten. Cats, dogs and horses are affected too. Handling is fine, but bag the clippings and keep them away from pets.

The almanac, state by state. Every date on this site comes from a state’s own frost facts and its extension service’s calendar — and says where it comes from.