Skip to content

Spring Bulbs

Tulips Not Coming Back: Causes and How to Fix It

Tulips Not Coming Back: Causes and How to Fix It

Tulips that thrilled you the first spring often send up a tired show the next, with fat leaves and few flowers or none at all. Modern hybrid tulips spend most of their stored energy on that first bloom. The bulb then has to rebuild in the ground, and it often cannot.

Tulips Not Coming Back: What You See

The signs show up in spring, as the clump emerges and the buds should be forming.

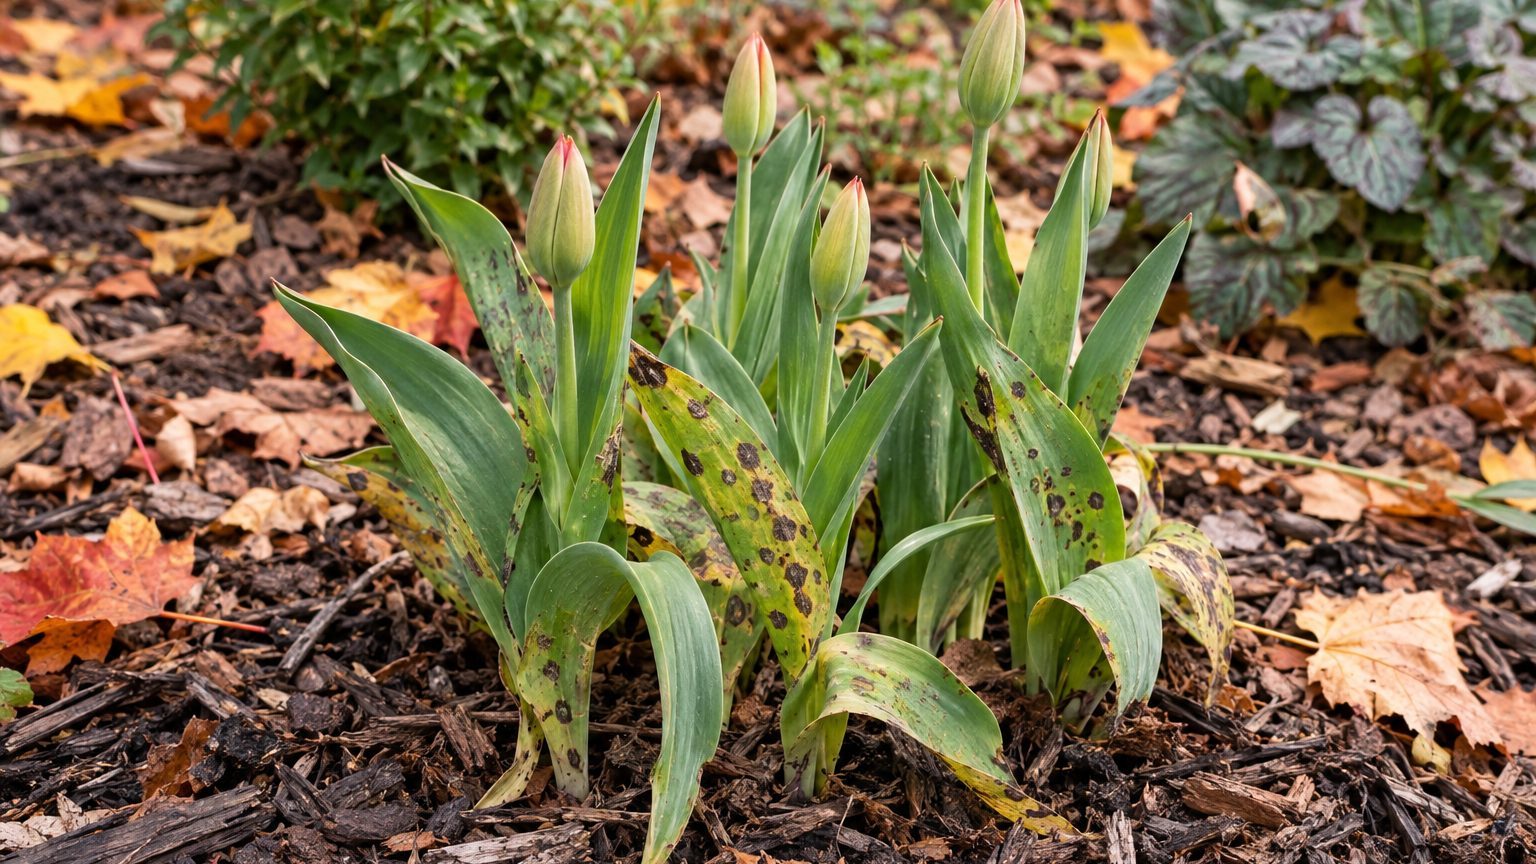
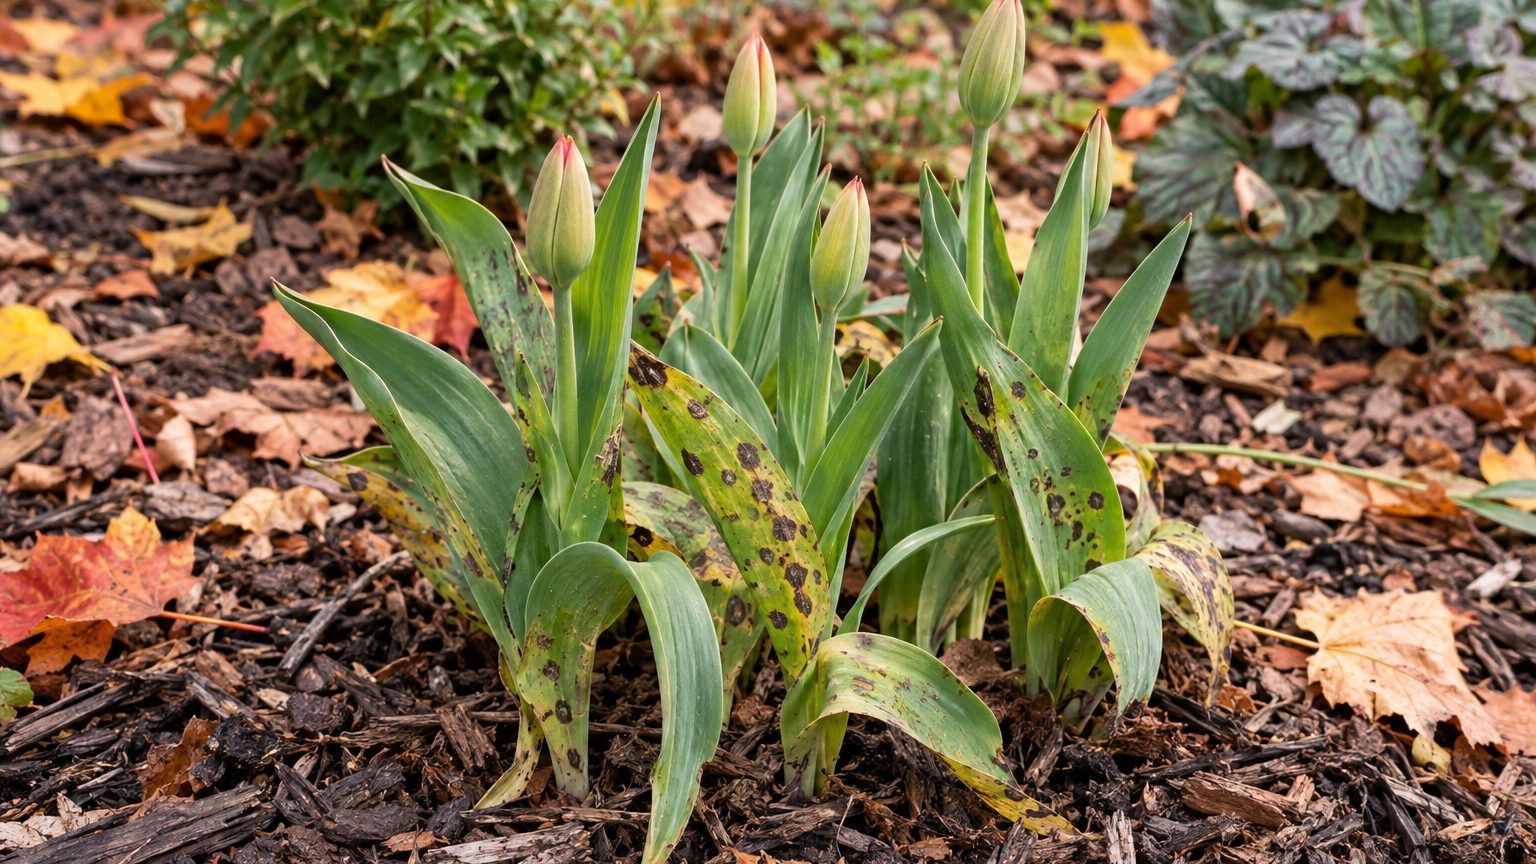
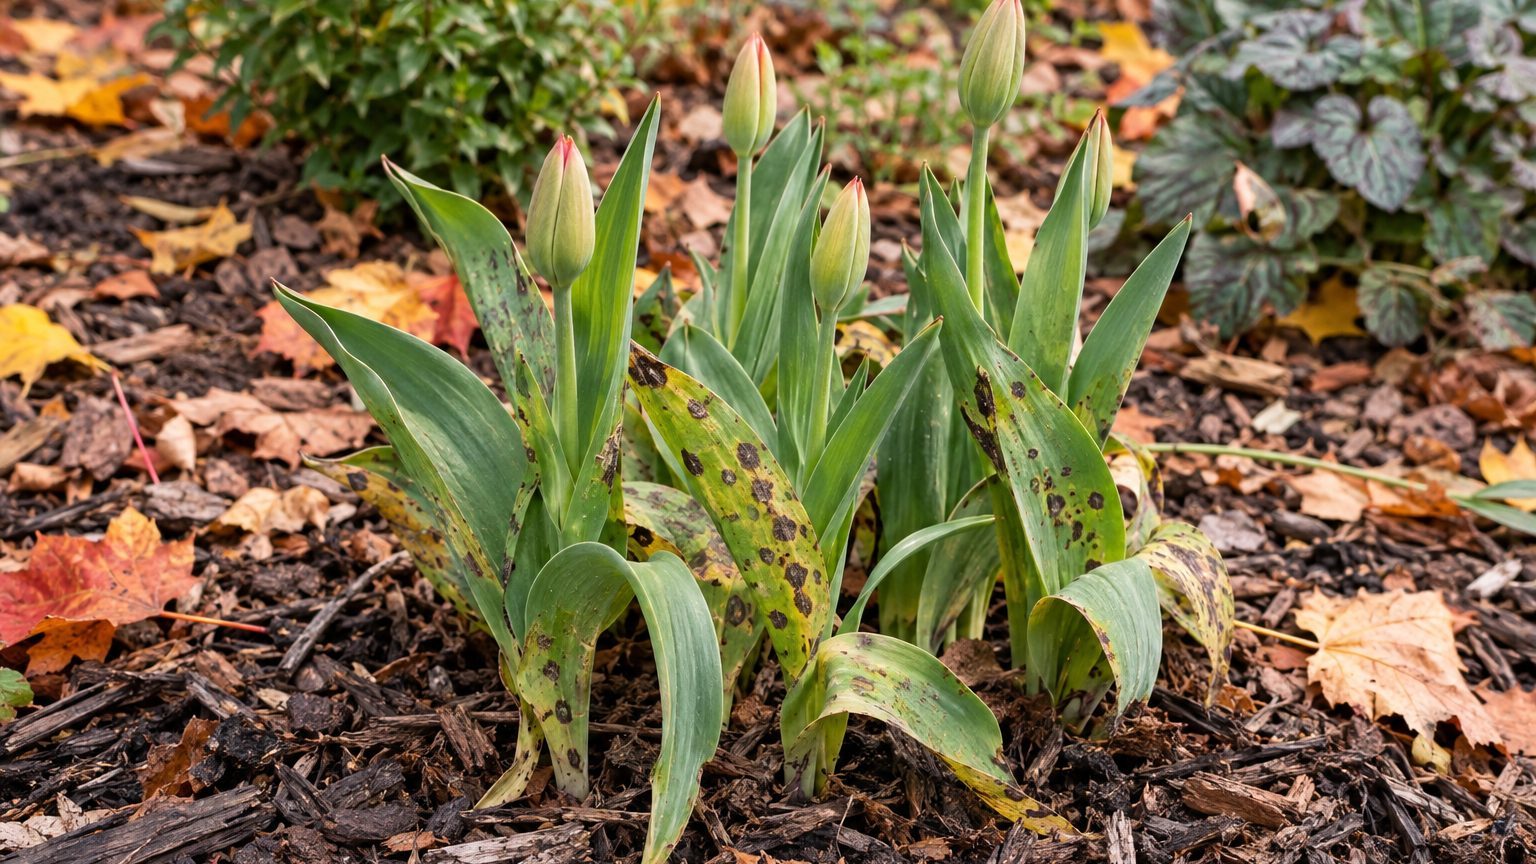
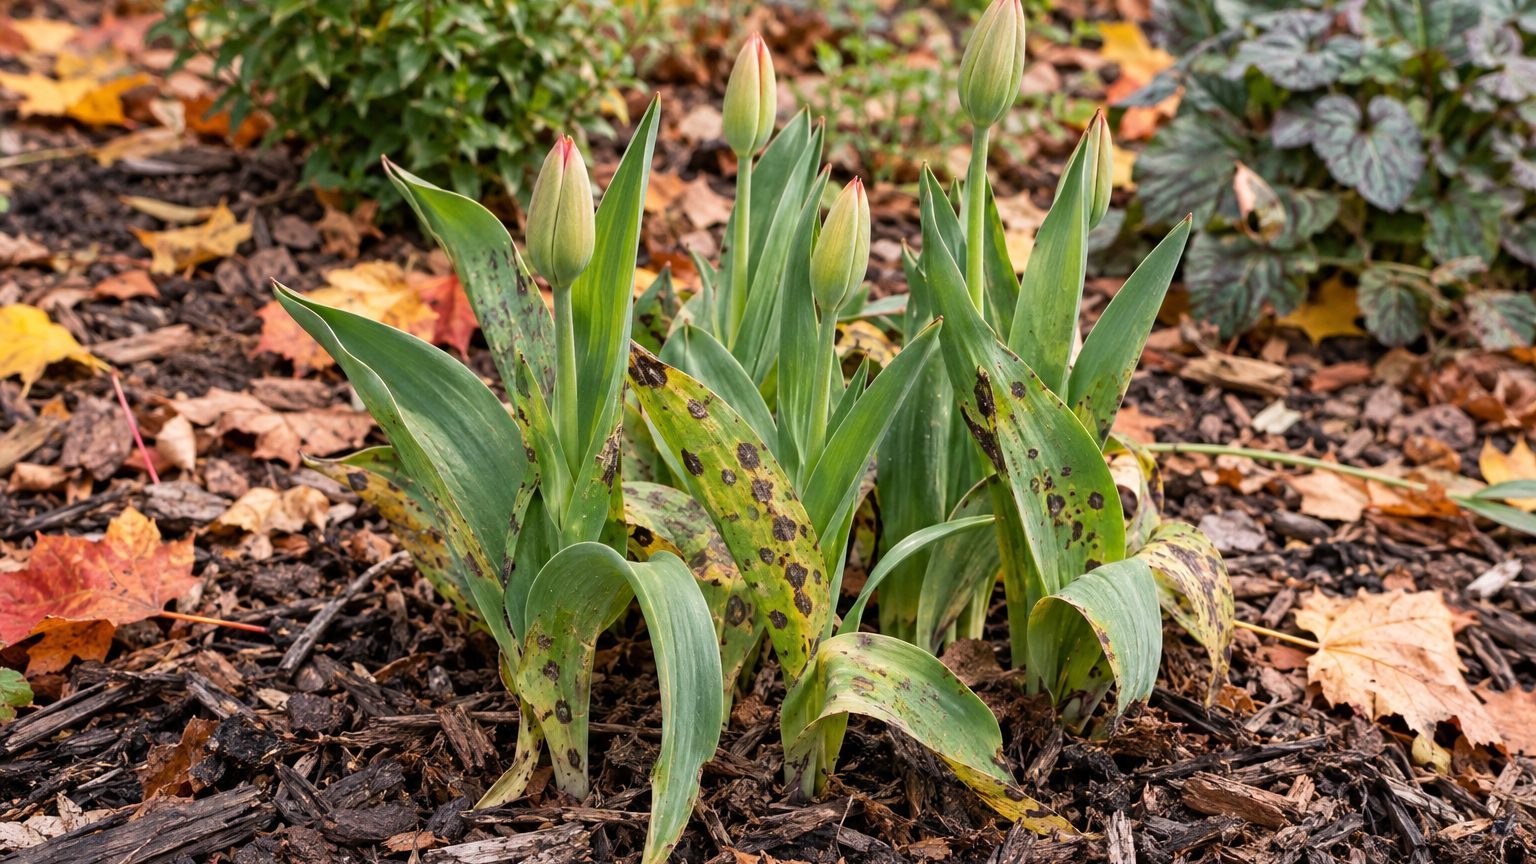
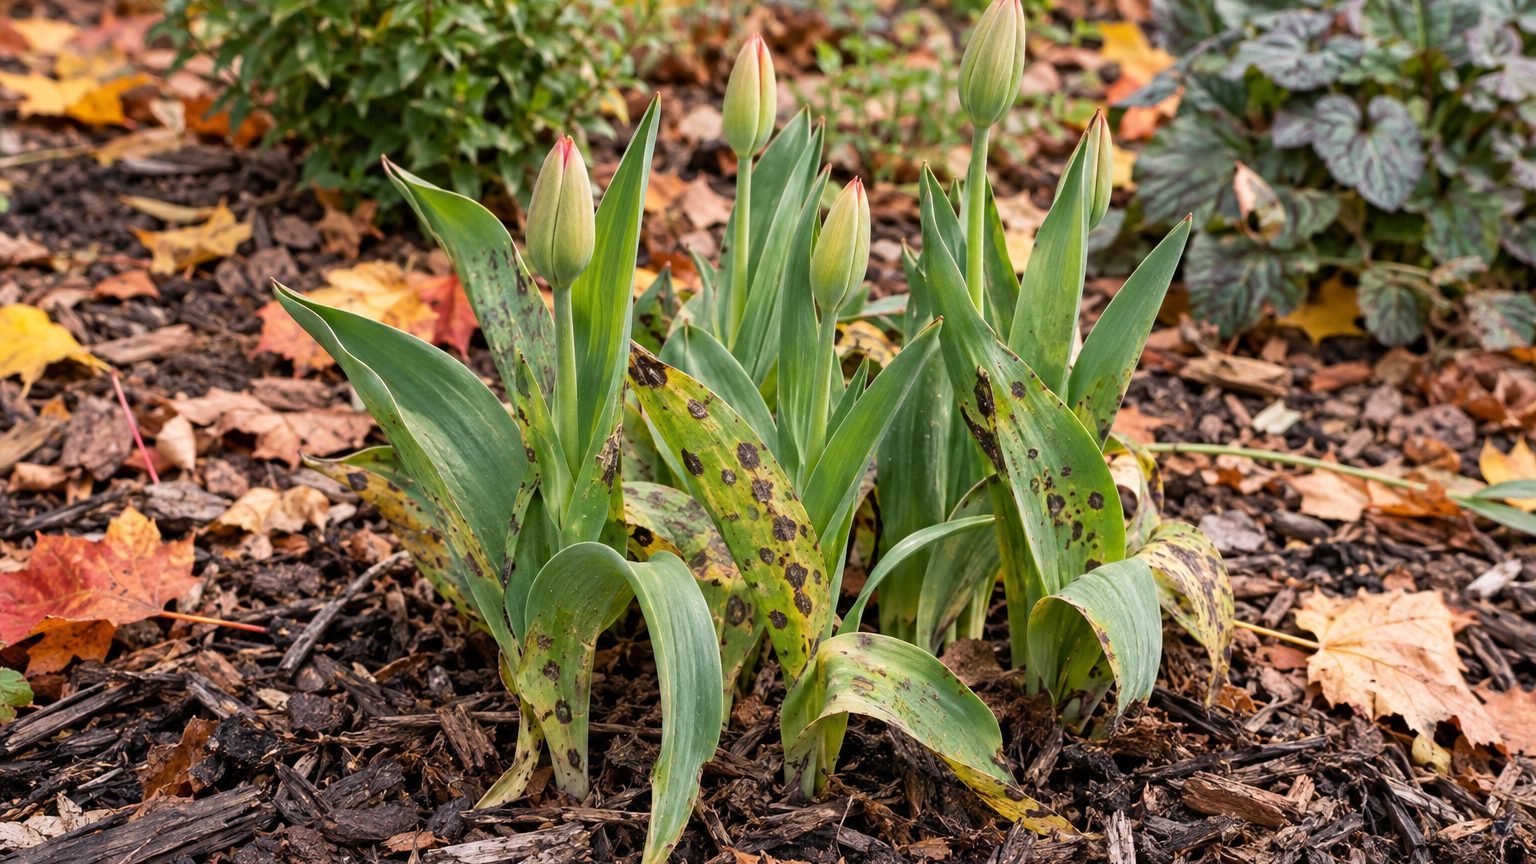
  • Big, floppy leaves rise from the ground with no flower stalk at all, which is how a weak bulb behaves.
  • Flowers do appear, but fewer and smaller than in the first year, since performance usually drops starting in the second year.
  • Nothing comes up in some spots, or the shoots are stunted with yellow or reddish leaves, which can mean the bulb underneath has rotted.
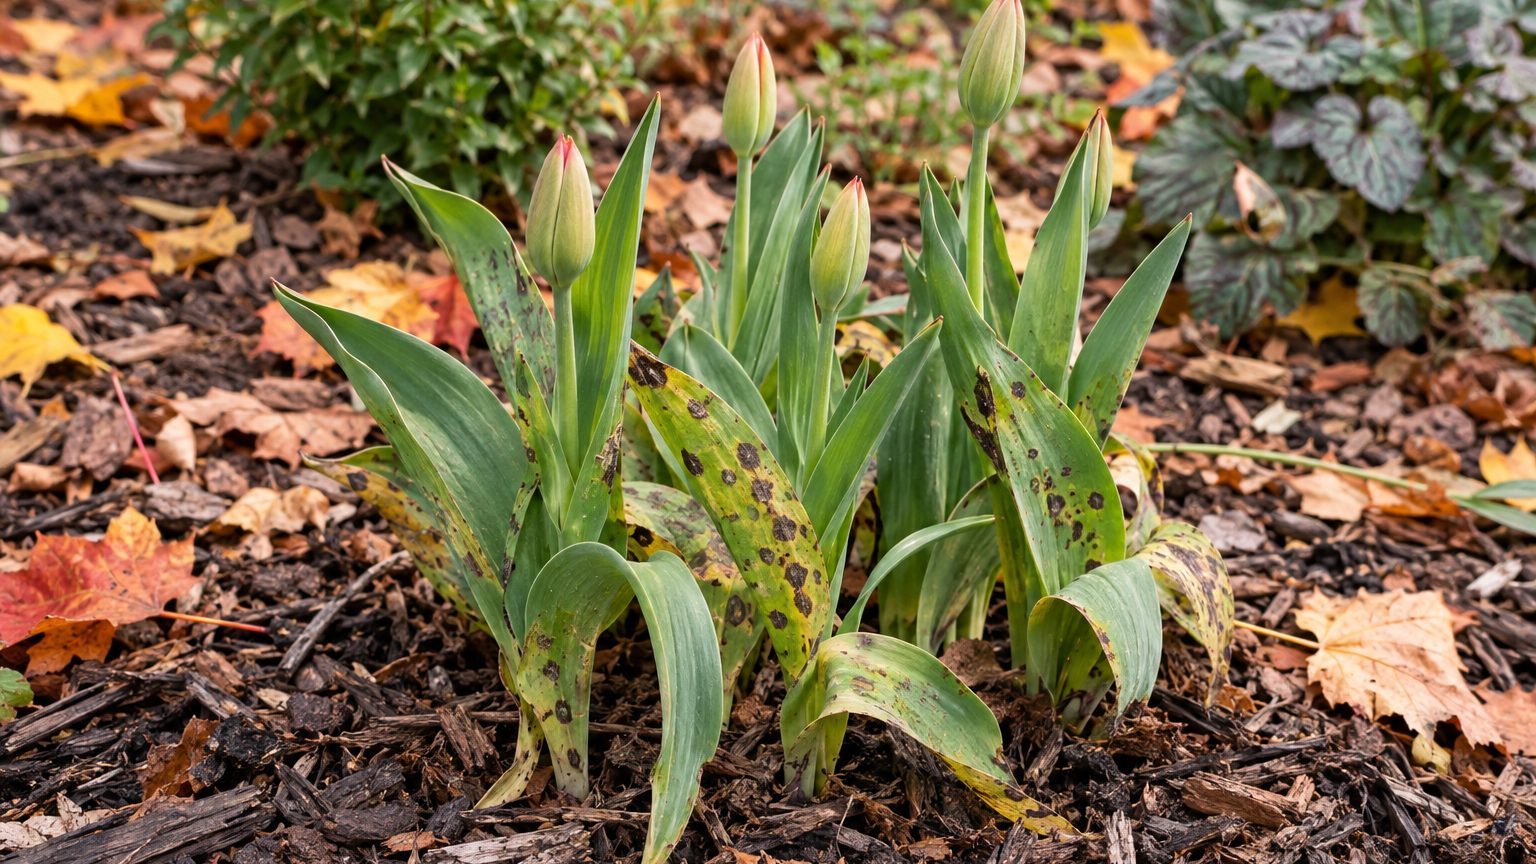
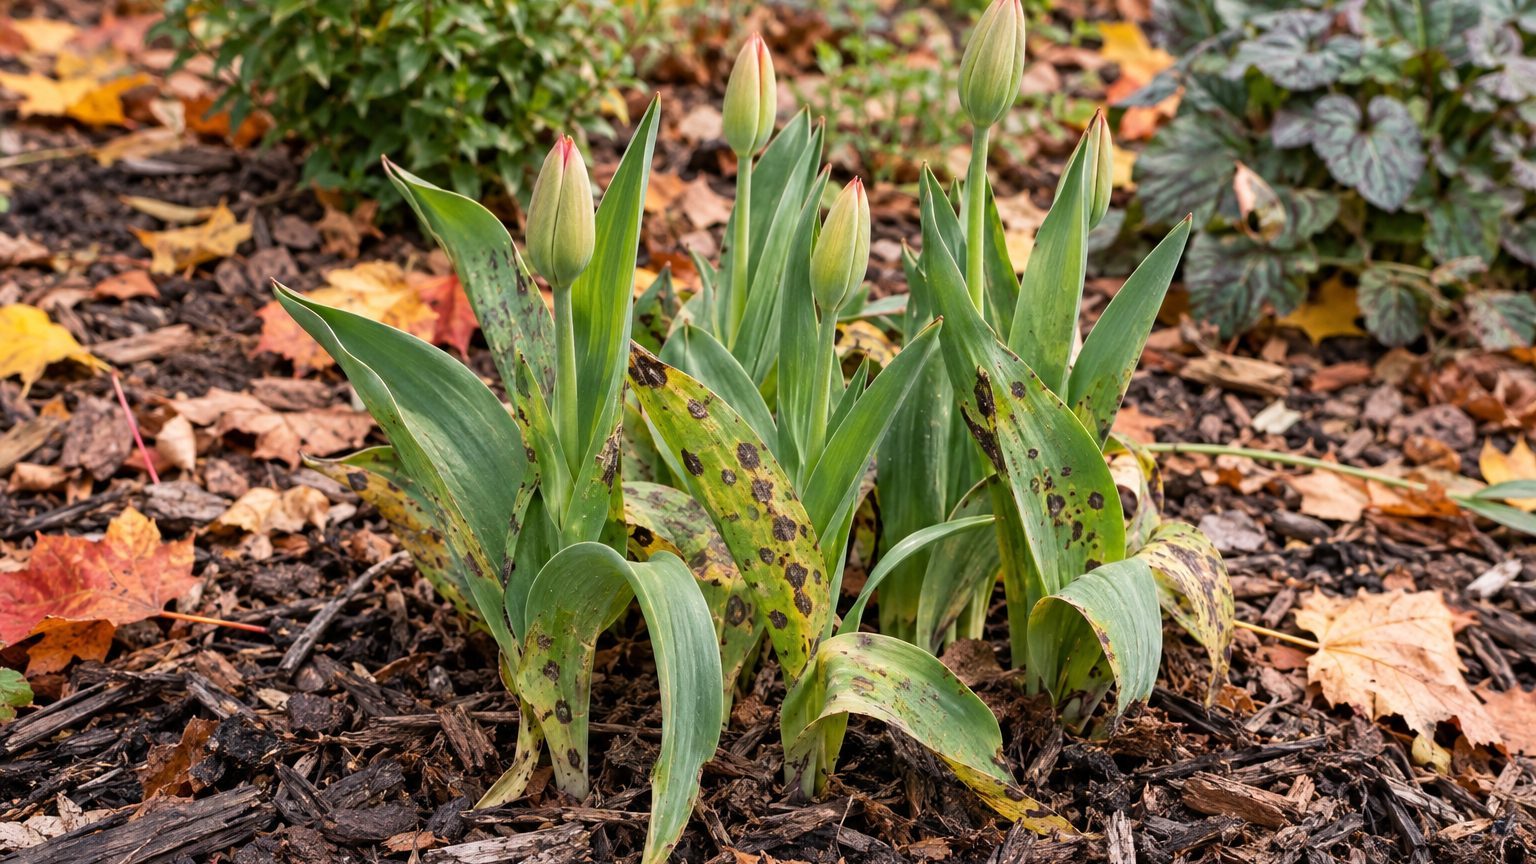
  • Large, light tan patches show on the leaves, sunken and yellow at the edge with a water-soaked rim, most noticeable on light-colored varieties.
  • Flower buds form and then shrivel before opening, a pattern linked to ripening fruit gas around the bulbs before planting.

Where the problem sits in the bed tells you a lot, so note whether it is scattered bulbs, one damp corner or the whole planting.

Tulips Not Coming Back or Something Else?

Poor flowering from an exhausted bulb is the most common story, but other problems produce similar disappointment. A few clues separate them, and most take only a look at the leaves, the petals or the bulb itself.

Looks like How to tell them apart
Tulip fire disease Leaves are malformed with sunken, yellow to light tan patches ringed by a water-soaked area, and petal spots look white on colored flowers and brown on white ones.
Rotted bulb Shoots fail to come up or the leaves are yellow or reddish and stunted, and the bulb is rotted when you dig it up.
Buds aborted by fruit gas Buds start and then fail in bulbs that were chilled in a refrigerator alongside ripening fruit, because the ethylene gas stops flower development.

A tired bulb differs from all of these because its leaves stay clean and healthy looking. They are simply large and flowerless.

What Causes Tulips Not Coming Back, and Where It Is Worst

The cause is usually spent reserves. Once a tulip has flowered, it has often used so much energy that little remains in the original bulb, and modern hybrids decline in vigor rather quickly. Shallow planting, heavy soil, little feeding and cutting leaves too early all deepen the shortfall.

Warm climates make it harder. In North Carolina, tulips lose floral vigor when soil temperatures reach 70 degrees F, so a hot spring cuts the bulb’s recovery short. Species tulips often hold up better there as perennials than hybrids do.

In Florida, bulbs need chilling to bloom, about 60 days at 40°F or 120 days at 50°F, and even in northern Florida they often flower poorly or not at all. Northern gardens fare better, but sun and drainage matter. In Iowa, a site with at least 6 hours of direct sun and well-drained soil keeps tulips blooming longest.

How to Treat Tulips Not Coming Back

Work through the bed in the order the season gives you, starting at bloom time.

  1. Snip off spent flowers as soon as the petals fall, so that seed pods do not draw away the food the leaves are making for the bulb.
  2. Feed the clump after flowering, because that is when the bulb is rebuilding and has the most use for nutrients.
  3. Leave the foliage alone until it dies back naturally, since green leaves are still feeding next year’s flower.
  4. Clean up any diseased leaves and petals when they are dry, not wet, so that you do not spread the problem on damp tissue, and destroy infected plants rather than composting them.
  5. Dig up tulips that no longer bloom and discard the bulbs, because saving them for another year rarely pays off.
  6. Replant with good size, disease-free bulbs in loose, well-drained soil at a generous depth, handling them gently to avoid bruising.

Your state’s extension service can tell you what is approved for treating tulip fire where you live, and which fresh bulbs suit your winters.

How to Prevent Tulips Not Coming Back Coming Back

Prevention follows the bulb’s year, from planting through the weeks after the petals drop.

  • At planting in fall, choose a spot with full sun and good drainage, set the bulbs deeper than you might think, and start with firm, good size bulbs.
  • If you chill bulbs yourself in a warm climate, keep them out of any refrigerator that holds ripening fruit, which can make the buds abort.
  • In spring, space the planting so air moves between plants, and avoid crowding the bed with other perennials.
  • During wet spells, keep water off the leaves, and do not water tulips from above, since splashing helps disease spread.
  • Right after bloom, remove the spent flowers and feed the clump, then let the leaves yellow on their own.

Planting fresh bulbs in a new spot every few seasons keeps the display full without waiting for the old clump to fade.

Where This Comes From

The guidance here draws on university extension publications written for gardeners in states such as Florida, Texas, North Carolina and Iowa.

Chilling needs, soil temperatures and disease treatment vary by place, so confirm timing and approved treatments with your state’s extension service.

Common Questions

Can You Save Tulip Bulbs to Replant Next Year?

It is not recommended, because recovered bulbs rarely flower again. Park districts and public gardens treat tulips as annuals for that reason, since it is rare for an entire planting to return with the same display.

Do Species Tulips Come Back Better than Hybrids?

Species types tend to be more long-lived than hybrids. In North Carolina, species tulips often perform better as perennials than hybrid plants do.

How Many Years Do Tulips Bloom?

Most modern tulip cultivars bloom well for 3 to 5 years. Some tulip types, called classes, keep blooming well over a longer period, so a class label on the bulb package is worth reading.
Tulips Not Blooming: Causes and How to Fix It

Tulips Not Blooming: Causes and How to Fix It

Tulip leaves push up green and healthy in spring, then the flower stalks never show. The usual reason is a bulb that has run out of stored food, or one that never got enough winter cold, though a few other causes can look similar. Where the problem started tells you what to change.

Tulips Not Blooming: What You See

Tulips Not Blooming: Causes and How to Fix It

The clearest sign is a clump of leaves with no flower bud at all, and the other signs help you sort out why.

  • Leaves come up large and floppy, but no flower stalk rises from the center, which points to a weak bulb.
  • In Indiana, foliage can remain leaf-only when a bulb misses its required winter chill of 8-16 weeks.
  • Leaves look short and weak, then turn brown early, often after a dry winter and spring.
  • The planting shrinks over time, with fewer blooms than in its original display.
  • Bulbs dug from the soil show signs of decay, which suggests a fungus living in the bed.

A bed that flowered well before and now gives only leaves is a common version of this problem.

Tulips Not Blooming or Something Else?

Leaf-only tulips are not always a bulb problem. Drought stress and a fungus in the soil can produce brown, stunted foliage that seems like a bulb that failed to bloom, so check what else in the yard looks unhappy.

Looking at the leaves and then digging a bulb helps separate the likely causes.

Looks like How to tell them apart
Drought stress Short, weak leaves turn brown, and other plants nearby, such as groundcover and shrubs, show the same stress after a dry winter and spring.
Bulb fungus in the soil Foliage is poor and flowers are missing, and the dug bulb is decayed rather than firm, which a penicillium-type fungus causes.
Tulip blight A single infectious disease is unlikely when several different plants in the yard share the symptoms and the damage follows dry weather rather than staying confined to the tulips.

If the leaves are large and floppy rather than brown, a weak bulb is more likely. That pattern points back to a weak bulb or missed chilling.

What Causes Tulips Not Blooming, and Where It Is Worst

The cause often begins with the bulb itself. Tulips that flower use up so much energy that little is left in the original bulb, and modern cultivars tend to bloom well for 3 to 5 years before they decline in vigor. Weak bulbs make big leaves and no flowers.

Cold is the other main cause. In Indiana, spring bulbs including tulips need 8-16 weeks of chilling to form flower buds inside the bulb. Without it they sprout and grow only foliage. Mild winters and bulbs kept in a warm place before planting both cut that chilling short.

Other causes depend on the site. Poor drainage, shade, and a soil fungus that survives in the ground for years can all hold flowers back. In Iowa, tulips last longest in a spot with at least 6 hours of direct sun a day and well-drained soil. The fungus can arrive on new bulbs, in soil amendments, or on infected tools.

How to Treat Tulips Not Blooming

Once the leaves are up, there is little you can do to make that year’s bulbs flower, so the work is about saving next year’s display.

  1. Leave the leaves in place until they turn yellow, so that they keep feeding the bulb for next year.
  2. Snip off spent flowers soon after bloom, because seed pods take food that the bulb needs.
  3. Feed the bed after flowering, so that the bulb can rebuild what the bloom used.
  4. Dig up bulbs that are no longer blooming and discard them, so that weak or diseased bulbs do not keep taking space.
  5. Clean tools after digging, so that a soil fungus does not travel to other beds.
  6. Replant with good-size bulbs in loose, well-drained soil, set deeply, because larger bulbs hold more stored energy.

If a bed has decayed bulbs, check which treatment is approved in your state. Do not replant tulips in the same spot until you know the soil is sound.

How to Prevent Tulips Not Blooming Coming Back

Timing through the year keeps bulbs strong enough to flower again.

  • In fall, plant good-size bulbs deeply in loose, well-drained soil so that roots settle and the winter chill can do its work.
  • If bulbs are still unplanted, put them in the ground as soon as it can be dug.
  • In spring, remove spent flowers promptly so that no energy goes into seed pods.
  • After bloom, feed the bed while the foliage is still green.
  • Through early summer, let the leaves die back naturally before you remove them, because tulips that cannot store enough food in the bulb cannot flower.
  • Where winters stay mild, pot unplanted bulbs about 3-4 months before you want bloom, moisten the soil, and store them between 35 and 45 F.

Species tulips tend to be more long-lived, which makes them a steadier choice for a bed you want to leave alone.

Where This Comes From

These details connect leaf and bulb symptoms with the changes that can help future flowers. For rules and timing, use advice suited to your area.

Common Questions

Should You Replace Tulips Every Year?

Park districts and public gardens often treat tulips as annuals, because it is rare for a whole planting to come back with the same display. At home, you can keep them if they still bloom, and dig and discard those that no longer do.

Can You Make Tulips Bloom After the Leaves Have Come Up?

Not much can be done once the leaves have emerged without flower buds. Focus on feeding and leaving the foliage alone so the bulb recovers for the following year.

Do Tulips Need Full Sun to Bloom?

In Iowa, planting sites with at least six hours of direct sun a day help tulips bloom for more years, as long as the soil also drains well.

Bulbs Sprouting in Fall: Causes and How to Fix It

Bulbs Sprouting in Fall: Causes and How to Fix It

Green tips pushing through the soil in October look like a head start, but they are a warning. A spring bulb that sprouts in autumn has started growing before winter, and young leaves are tender. The cause is nearly always warmth, either in the ground or in storage, and the fix depends on whether the bulbs are planted or still waiting.

Bulbs Sprouting in Fall: What You See

The clearest sign is growth that arrives in the wrong season, and the rest follow from there.

  • Green shoots or leaf tips break the soil surface in autumn, long before any spring bulb should be showing.
  • Bulbs held in a garage, basement or paper bag grow pale shoots from the top, often stretched and floppy.
  • Stored sprouts that stay in the dark come out pale, while any that reach a little light turn green.
  • Leaves that look yellow or sickly are a sign the plant is struggling and needs a change of conditions.
  • Frost-bitten shoots show up later as limp, darkened or collapsed leaf tips on bulbs that came up too soon.

Shoots in the ground and shoots in storage call for different responses, so note which one you have before doing anything.

Bulbs Sprouting in Fall or Something Else?

Not every green blade in a bed or lawn in autumn is a bulb. Several weeds and ordinary grass tufts look close enough to cause a false alarm, and digging up a healthy bulb to check would do more harm than good.

Looks like How to tell them apart
Wild onion or wild garlic Thin, round, hollow leaves that smell of onion when crushed, growing in clumps in lawn or beds rather than where you planted bulbs
Grass tufts in a bed Narrow blades with a fine midrib that pull away from the roots easily, while a true bulb shoot is thick and sits over a firm bulb when you probe gently

Shoots that appear exactly where you planted bulbs, in a pattern matching the planting, are the bulbs themselves. Foliage in odd spots with no bulb below is something else.

What Causes Bulbs Sprouting in Fall, and Where It Is Worst

Warmth wakes a bulb. A bulb planted into warm soil, or kept somewhere that never gets cold enough, reads the conditions as spring and starts to grow. Even bulbs stored cold and dark can sprout early, so a careful gardener can still see it happen.

Planting too early is the common route in the ground. In Indiana, the suggested window is late September through mid-October, and planting ahead of it may send up growth that winter weather kills back. Bulbs are set in fall so roots can establish before top growth begins in spring, which is why roots, not leaves, should be the autumn goal.

No single region owns this problem. It follows any warm stretch of autumn, from the Gulf Coast to the Upper Midwest, and it gets worse wherever soil stays warm late. Local planting dates differ, so the safe move is to match your own state’s window.

How to Treat Bulbs Sprouting in Fall

The aim is to slow growth down while keeping the plants healthy, and the steps change a little depending on where the bulbs are.

  1. Check where the bulbs are, so that you treat stored bulbs and planted bulbs differently.
  2. Move stored bulbs to the coolest place you have, above freezing but not far from it, so that growth slows or the bulbs settle back toward dormancy.
  3. Watch the shoots, and if the leaves turn yellow or sickly, or keep growing larger, shift the bulbs into low to moderate light at cool to moderate temperatures, so that the plants stay healthy.
  4. Plant any bulb still unplanted as soon as the ground can be dug, so that roots get going before winter.
  5. Leave shoots already in the ground alone and never cut or tie green leaves, so that they keep feeding the bulb for next year.
  6. Ask your state’s extension service about local timing, so that your next planting lands in the right window.

Shoots that get nipped by frost are usually a cosmetic loss. Healthy bulbs underground can still do their work when spring returns, but nothing can be promised about the flowers.

How to Prevent Bulbs Sprouting in Fall Coming Back

Prevention is mostly about timing the planting and the storage.

  • In late summer, keep unplanted bulbs somewhere cool and dark, so that they do not start to wake before the ground is ready.
  • In late September through mid-October in Indiana, plant bulbs rather than sooner, so that roots form without a burst of top growth.
  • After planting, check the bed during warm spells in autumn, so that early shoots are noticed before frost reaches them.
  • In late fall, once the soil has cooled, add a layer of mulch, so that the ground stays steadier through winter swings.
  • In spring, let the leaves yellow naturally before tidying, so that the bulb refills for the following year.

Outside Indiana, use the planting window your own state recommends, since warm and cold regions differ.

Where This Comes From

These notes draw on university extension guidance, including advice written for Indiana gardeners. Planting windows differ from state to state, so confirm yours with your state’s extension service.

Common Questions

Can You Still Plant Bulbs That Have Already Sprouted?

Yes. Set them in the ground as soon as it can be dug and handle the shoots gently so they do not snap.

Should You Remove Early Shoots from Planted Bulbs?

No. Green leaves feed the bulb, so leave them even if frost bites the tips.

Will Sprouted Bulbs Bloom in Spring?

Some may, but nothing is guaranteed. Healthy leaves and cool conditions give the bulb the best chance to recover.

Bulbs Rotting in the Ground: Causes and How to Fix It

Bulbs Rotting in the Ground: Causes and How to Fix It

A tulip or daffodil that never breaks the soil in spring, or comes up and wilts, often has a bulb gone soft underneath. Rot in spring bulbs can be caused by fungi or bacteria, while wet soil and wounds in bulb tissue favor infection. Once a bulb is infected, it does not come back.

Bulbs Rotting in the Ground: What You See

The clearest evidence is underground, though the leaves give early warning.

  • A bulb dug up from a failed spot feels soft or spongy, and the decayed tissue has turned brown to purplish-red.
  • The decay starts at the roots or the base of the scales and climbs upward inside the bulb.
  • Shoots fail to emerge in spring, or they emerge and wilt soon after.
  • In Iowa, tulips with stunted, yellowed leaves that never fully emerge are a typical sign of bulb rot.
  • Brown lesions show at and just below the soil line, with darkened strands inside the stem.

Plants that do come up from an infected bulb grow weakly and flower poorly, if at all.

Bulbs Rotting in the Ground or Something Else?

Several other bulb troubles also cause weak growth or ugly bulbs, and they call for different handling. Cutting the bulb open and looking at where the damage sits usually settles it.

Rot from the fungus described here starts at the base of the bulb and moves up, without a ringed pattern or a coat of mold.

Looks like How to tell them apart
Stem and bulb nematode damage Slice the bulb crosswise: darkened scales form rings, and yellowish pockets hold the tiny worms.
Crown rot The bulb is wrapped in layers of coarse white mold, which is not the brown to purplish decay of basal rot.
Smolder Leaves are stuck together as they emerge, and foliage and flowers rot in a cold, wet season.

Cool, soggy weather can favor overlapping problems, so check the bulb’s base and outer surface.

What Causes Bulbs Rotting in the Ground, and Where It Is Worst

Basal rot is caused by the soil fungus Fusarium oxysporum F. sp. Narcissi, which survives between seasons as microscopic spores. In Oregon, it becomes active in early spring or early summer when the soil reaches about 55 degrees Fahrenheit, and it attacks the bulb at its basal plate, the flat base where roots grow.

Wet ground gives the fungus its opening. Cool, soggy conditions and long stretches of wet weather favor infection, and bulbs sitting in water for long periods rot. Wet conditions favor bulb rot in Connecticut and South Carolina, so the problem is not confined to a particular region.

The fungus also arrives with the bulb itself. Wounds from digging, insects or rough handling let it in, and some bulbs carry a hidden infection with no symptoms until planting wakes it up. In Oregon, depending on soil temperatures, it can spread to neighboring bulbs along the roots.

How to Treat Bulbs Rotting in the Ground

Treatment means removing what is infected and changing the conditions around it, because a diseased bulb cannot be rescued.

  1. Pull up any plant that fails to emerge, wilts soon after emerging, or will not flower, so that the fungus has less bulb tissue to feed on and spread from.
  2. Dig carefully around the spot and check the neighboring bulbs; in Oregon, depending on soil temperatures, the fungus can travel between bulbs along the roots.
  3. Bag the diseased bulbs and old plant material and put them in the trash, because most home compost bins never get hot enough to kill the fungus.
  4. Rake out leftover plant debris from the bed, as the fungus winters over on diseased tissue from the year before.
  5. Improve a bed that stays wet by working in organic matter such as compost or shredded pine bark. In South Carolina, the advice is 2 to 3 inches of it.
  6. Mix it in deep enough to reach the root zone, which in South Carolina means 10 to 12 inches, so water drains below the bulbs instead of pooling around them.

Fungicide choices and approvals differ by state, so check what is allowed and useful where you garden. Bulbs that have already rotted will not come back, so the real gain comes from better drainage and clean replanting.

How to Prevent Bulbs Rotting in the Ground Coming Back

Prevention follows the bulb year, starting before planting and continuing through spring cleanup.

  • In early spring, watch the bed for bulbs that fail to emerge and pull them promptly so the problem does not spread underground.
  • When the soil warms and the fungus becomes active, keep standing water off the bed by clearing gutters, downspouts and low spots that flood after rain.
  • After the foliage has turned yellow and died back on its own, clear the dead leaves and debris from the bed, but leave green leaves alone because they feed the bulb for next year.
  • In fall, before planting, handle each bulb gently and set aside any that are soft, damaged or moldy, since wounds are an entry point for the fungus.
  • At planting time, choose a spot with fertile, well-drained soil and loosen heavy soil with compost first.

Poets narcissus tolerates damp soil, while most spring bulbs need fertile, well-drained ground.

Where This Comes From

These details explain how to recognize bulb rot, remove affected bulbs, and make the bed less favorable to disease. Soil, weather and approved treatments vary by place, so use advice suited to local conditions before you replant or treat a bed.

Common Questions

Can a Healthy-Looking Bulb Still Be Infected?

Yes. Some bulbs carry the fungus without showing any sign, and the problem appears only after planting, when the fungus becomes active again. Firm, undamaged bulbs lower the risk, but cannot remove it.

Can Bulbs Rot While They Are in Storage?

They can. Basal rot often develops in storage, and infected bulbs can pass it to the ones next to them. Check stored bulbs before planting, toss the soft ones, and plant the rest as soon as the ground can be dug.

Which Spring Bulbs Tolerate Damp Soil?

Poets narcissus tolerates damp soil. Most other bulbs need fertile, well-drained ground, so a bed that stays soggy needs improvement before you plant anything else.

Floppy Tulip Stems: Causes and How to Fix It

Floppy Tulip Stems: Causes and How to Fix It

Tulip leaves that sprawl across the bed in spring, broad and lax, with no flower rising from the middle, are a common sight. It is the mark of a bulb running low on stored food. The cause is usually in how the bulb was treated after last year’s bloom, and it can be corrected.

Floppy Tulip Stems: What You See

A weak tulip clump looks different from a healthy one well before any flower should appear.

  • Large, floppy leaves come up from the bulb, but no flower bud forms in the center of the plant.
  • The leaves look oversized and soft, and they lean outward or lie on the soil instead of standing upright.
  • The color is usually a normal green, so the plant looks healthy at a glance even though it is not flowering.
  • The problem shows in the spring growing season, when neighboring tulips are sending up buds.
  • Clumps that bloomed well in earlier years may now send up only leaves, often in the same spot year after year.

Look at the whole bed rather than one plant, because weak bulbs tend to cluster where conditions are the same.

Floppy Tulip Stems or Something Else?

Not every drooping tulip is a weak bulb. Timing and the condition of the leaves usually separate a real problem from normal plant behavior.

Leaves that flop after the flowers are finished, and a stalk that carries a swollen pod, are both common sights in the yard.

Looks like How to tell them apart
Natural dieback after bloom Leaves turn yellow and fall over after the flowers have faded, and the plant had flowered earlier that same season.
Spent flowers left on the stalk A swollen seed pod sits at the top of a stalk that leans, and the leaves are still green around its base.

A stem bent by heavy rain or wind is another look-alike. It carries a flower or bud, which a weak bulb never produces.

What Causes Floppy Tulip Stems, and Where It Is Worst

A weak bulb is the cause. The leaves are the bulb’s kitchen, and whatever interrupts that food-making leaves the bulb too small to flower. Seed pod formation takes much of the food the foliage manufactures, and cutting the leaves too soon cuts off the supply.

Site matters as much as care. In Iowa, tulips do best in a spot with at least 6 hours of direct sun per day and well-drained soil. A shady corner or a spot where water lingers weakens bulbs year after year.

Beds under maturing trees, low spots that stay wet after rain, and borders beside a lawn that gets mowed over tulip leaves tend to show it first.

How to Treat Floppy Tulip Stems

You cannot make a weak bulb flower this season, but you can help it rebuild. Work in this order.

  1. Snip off spent flowers promptly after the petals drop, so that the plant does not spend its food on seed pods.
  2. Leave the leaves in place until they turn yellow and die back naturally, so that they keep feeding the bulb.
  3. Check the bed for sun and drainage while the leaves are still up, so that you know whether the site is the problem.
  4. Dig the clumps once the foliage has died back if the site is too shady or too wet, so that you can move them without cutting into green leaves.
  5. Replant the bulbs in the fall in a sunny, well-drained bed, in the ground as soon as it can be dug, so that the roots can settle before winter cold arrives.

Whether a fertilizer helps, and which products are approved where you live, is a question for your state’s extension service or a local master gardener group.

How to Prevent Floppy Tulip Stems Coming Back

A little planning around the seasons keeps bulbs well fed and keeps leaf-only clumps from showing up again.

  • In early spring, note which clumps send up only leaves, so you know which ones to move later.
  • As the flowers fade in mid to late spring, remove them before pods form on the stalks.
  • While the leaves are still green, keep mowers, edgers and string trimmers well away from them.
  • Once the foliage has yellowed and pulled away easily, tidy it up and dig any clumps that sat in shade or soggy soil.
  • In fall, plant the moved bulbs and any new ones in a sunny bed that drains well, since they need winter cold to flower.

A bed set up this way usually keeps its bulbs in bloom longer than one left to chance.

Where This Comes From

The care steps here reflect university extension guidance, including advice written for Iowa. Check your own state’s extension service for timing and local conditions where you garden.

Common Questions

Will Floppy Tulips with No Flowers Bloom Again?

They can, if the bulb gets enough sun and its leaves are left to work. Recovery is not guaranteed, and a bulb that stays leaf-only after a season of better care may be worth replacing.

Should You Tie Up Floppy Tulip Leaves to Tidy the Bed?

No. Tying or bending the leaves cuts down the light they catch. If the sprawl bothers you, plant something low and leafy nearby to cover it as the foliage fades.

Do Tulip Bulbs Need Cold to Flower?

Yes. Tulips planted in fall need winter cold to set flowers, and a bulb that gets cold but little food will still produce leaves without a bloom.

Daffodils Not Blooming: Causes and How to Fix It

Daffodils Not Blooming: Causes and How to Fix It

You see green daffodil leaves push up in early spring, thick and healthy, and then no flowers follow. It happens in yards everywhere, and the bulb is rarely dead. A bulb that skips blooming has usually run short on stored food, and the reasons trace back to light, leaf care, crowding, drainage, or the bulb itself.

Daffodils Not Blooming: What You See

The clearest sign is a clump that leafs out normally but never sends up flower stalks, though a few variations point to different trouble.

  • Green leaves come up on schedule, but no flower stalks rise from the center of the clump.
  • Buds do form, then turn brown and papery before they open.
  • Flowers still appear, but they are smaller than in earlier years, and the clump looks packed with leaves.
  • Only a few blooms show on a patch that once put on a full display.
  • Newly planted bulbs produce leaves and nothing else in their first spring.

Where the clump sits matters as much as the symptom, so notice whether it grows in shade, in a wet spot, or among turf and other plants.

Daffodils Not Blooming or Something Else?

Some problems look like a bloom failure but have a different cause. Browned buds and a rotting bulb both end the season without open flowers, yet they call for different fixes than a bulb that is simply underfed.

Looks like How to tell them apart
Disease on the buds Buds formed but turned brown, often after a stretch of rough weather, instead of never forming at all.
Bulb rot from wet soil Clumps in poorly drained ground weaken fast and stop flowering after the first year, and the bulbs feel soft when dug.

Young bulbs are a third look-alike. Some suppliers sell bulbs a year or more away from their best flowering, so a skipped first spring from a fresh purchase may only mean the bulb needs time in the ground.

What Causes Daffodils Not Blooming, and Where It Is Worst

A daffodil blooms only if it stored enough food in the bulb the year before. Anything that limits that storage can cost you flowers: too little sun, leaves removed too early, crowding, poor drainage, too little fertilizer, or too much nitrogen. Virus and competition with other plants can add to it.

Light is a common culprit under trees and beside buildings. Daffodils tolerate fair amounts of shade, but in Missouri the guidance is at least five hours of sunlight a day for the bulb to build up and flower year after year. Turf and groundcover that crowd the clump compete for the same food and water.

Weather and soil change the picture by region. In Washington, early extreme heat in spring can stress the plants, and in South Carolina bulbs may rot where soil stays wet for long stretches. Cold winters are rarely the issue when bulbs went in deep enough, and planting too shallowly is itself a cause of sparse flowers.

How to Treat Daffodils Not Blooming

Work through the likely causes in the order that gives the quickest payoff for next spring.

  1. Note how much sun the clump gets, so that you know whether shade is the real problem and whether the bulbs should move to a brighter spot.
  2. Leave the leaves alone after flowering until they are withered, dried, and brown, so that they keep feeding the bulb for next year’s growth.
  3. Dig and divide clumps once the foliage has died back and the flowers have shrunk, so that each bulb has room and a share of the soil’s nutrients.
  4. Replant at a good depth in well-drained soil, since bulbs set too shallowly bloom sparsely and bulbs in wet ground rot.
  5. Feed the bed modestly if it has gone without fertilizer, and avoid heavy nitrogen, which pushes leaves at the expense of flowers.

Recovery takes patience. Bulbs that were stored without enough winter chilling will likely flower normally the following spring if they stay in the ground to establish, and their leaves should still be left to wither on their own. For fertilizer type and rates that suit your soil, your state’s cooperative extension service can advise.

How to Prevent Daffodils Not Blooming Coming Back

A few habits tied to the seasons keep bulbs fed and flowering.

  • In spring after the flowers fade, leave the foliage standing. In Iowa, daffodil leaves typically last four to six weeks after bloom while they make food, and in Missouri they should stay on for about eight weeks.
  • Through late spring, mow around the clump and keep the blade off the leaves until they turn brown, especially where daffodils grow in or beside turf.
  • When the leaves have withered completely, tidy them away and mark clumps that bloomed poorly so you can divide them.
  • In fall, plant any bulbs you buy that same season, setting them deep enough in a sunny, well-drained spot.
  • Each year in early spring, check that nearby plants are not shading or crowding the bed.

Buying from a reliable supplier also helps, since younger bulbs take longer to hit their stride.

Where This Comes From

These recommendations come from university extension guidance on spring bulbs, with place-specific notes kept to the states where they were written.

Timing and soil advice vary, so check with your state’s cooperative extension service for what suits your yard.

Common Questions

Will Daffodils Bloom the First Spring After Planting?

Not always. Bulbs stored somewhere without enough winter chilling often skip flowers, which is typical, and younger bulbs may be a year or more from their best. Leave them in the ground and they will likely flower normally next spring.

Can a Cold Winter Keep Daffodils from Blooming?

Cold alone should not be the problem if the bulbs were planted deep enough. Daffodils also need winter chilling to flower, so a hard winter is not what to blame when buds fail.

Why Did the Buds Turn Brown Before Opening?

Browned buds can come from disease that was made worse by weather. Look at drainage and crowding too, and clear away spent growth once the leaves have died back naturally.

Bulbs Coming Up Too Early: Causes and How to Fix It

Bulbs Coming Up Too Early: Causes and How to Fix It

Green leaf tips pushing through the mulch in late winter, long before the garden looks ready for them, send many gardeners straight to the forecast. Tulips, crocus and daffodils sometimes wake during a mild spell and start growing ahead of schedule. The sprouting itself is usually harmless, and the spot where the bulbs sit tells you most of what you need to know.

Bulbs Coming Up Too Early: What You See

The picture is easy to spot once you know where to look, and it tends to repeat from year to year in the same places.

  • Green foliage shows above the soil in late winter or early spring, while the rest of the yard still looks dormant.
  • The early leaves cluster along a south or west wall, or on a south-facing slope, rather than scattered evenly across the bed.
  • Bulbs planted tight against the foundation of the house are up well ahead of those out in the open lawn.
  • Flower buds sometimes appear along with the leaves after a stretch of warm weather.
  • When cold returns, growth slows and the buds are the tender part, with damage possible if temperatures drop well below freezing.

Firm, green leaves are a good sign, because the foliage itself is quite cold-hardy.

Bulbs Coming Up Too Early or Something Else?

A few look-alikes get mistaken for a bulb problem. The plant is fine in each case, but the cause and the right response differ.

Checking the leaves first, then the location, separates them quickly.

Looks like How to tell them apart
Frost-damaged flower buds Leaves look healthy, but the buds themselves were hit after a night of hard freezing temperatures, so the damage sits in the bud rather than the foliage.
Normal early bloom in a warm microclimate Bulbs by a building or in a sunny spot flower ahead of those out in the yard or in shade, so the timing difference follows the placement.

A difference of weeks between neighboring beds is rarely a sign of trouble. It usually reflects how much warmth each spot holds.

What Causes Bulbs Coming Up Too Early, and Where It Is Worst

The trigger is warm weather in late winter or early spring. Bulbs respond to warm weather, so a mild stretch can start leaves and even flower buds before the season has truly turned.

Site decides how strongly that happens. Early emergence is often seen on south or west exposures. In Colorado, bulbs planted near a foundation, especially on south or west sides, or on a south-facing slope, are the ones most susceptible to early emergence and freeze injury.

Region plays a part too, since local weather and microclimates shift bloom timing. In Indiana, southern areas of the Midwest can be 3-4 weeks ahead of northern areas, so early growth that looks alarming in one yard is routine in another farther south.

How to Treat Bulbs Coming Up Too Early

Treatment is mostly restraint, with a little protection kept ready for the occasional cold night.

  1. Leave the foliage alone, because it is quite cold-hardy and does not need rescuing from a cool spell.
  2. Check the overnight forecast regularly, so that you know when a hard frost is coming.
  3. Cover the bulbs on unusually cold nights, since in Colorado a hard frost is the point at which covering is advised.
  4. Remove the covers in the morning, so that the leaves get light and the soil can warm again.
  5. Note which beds sprouted first, so you can adjust where you plant new bulbs in the fall.

Never cut or tie green leaves, even if they look ragged after a cold snap.

How to Prevent Bulbs Coming Up Too Early Coming Back

Prevention follows the calendar and begins with where the bulbs go into the ground.

  • In fall, when planting new bulbs, avoid foundations and south-facing exposures.
  • After the ground has frozen in fall, mulch existing plantings on susceptible sites. In Colorado, that means a six-inch layer of organic material such as straw or shredded leaves.
  • In late winter, keep a cover or extra mulch within reach, so a hard frost does not catch emerged buds unprepared.
  • In spring, once the flowers fade, let the foliage yellow naturally before you tidy the bed.

Planting out in the yard or in partly shaded beds, rather than beside a sunny wall, also tends to delay bloom.

Where This Comes From

The guidance here draws on university extension advice written for Colorado and Indiana. Frost dates and bulb timing vary widely from place to place, so confirm local details with your own state’s extension service.

Common Questions

Do Bulbs Come Up Sooner in a City than in the Country?

Often they do. Urban areas tend to be warmer than rural ones, and even certain areas of a single garden can be warmer than others.

Does Snow Help Bulbs That Have Already Sprouted?

Yes. Snow is a great insulator and may protect hardy flowers from frosty temperatures, so a blanket of it over young leaves is welcome rather than a worry.

Can Tulips, Crocus and Daffodils Handle Frost Once They Are Up?

In Colorado, spring bulbs such as these tolerate a light frost, or temperatures of 29 degrees Fahrenheit and above. Colder nights call for covering, as described above.

Voles on Spring Bulbs: How to Spot Them and Get Rid of Them

Voles on Spring Bulbs: How to Spot Them and Get Rid of Them

Bulbs that never came up, with little trails and holes in the soil where they were planted, usually point to voles working underground. These small rodents go after tulips and crocuses especially. Spotting the signs early, then cutting off their cover and their access, is what protects next year’s planting.

Voles: What You See

Voles on Spring Bulbs: How to Spot Them and Get Rid of Them

Most vole signs show up in the soil and on the bulbs themselves.

  • Little trails or mounds in the soil, with small holes here and there, mark where voles come and go.
  • Bulbs that fail to sprout or vanish completely can reveal feeding that happened out of sight underground.
  • Melting snow can reveal a criss-cross network of runways in the lawn, which is how Pennsylvania homeowners often discover meadow voles.
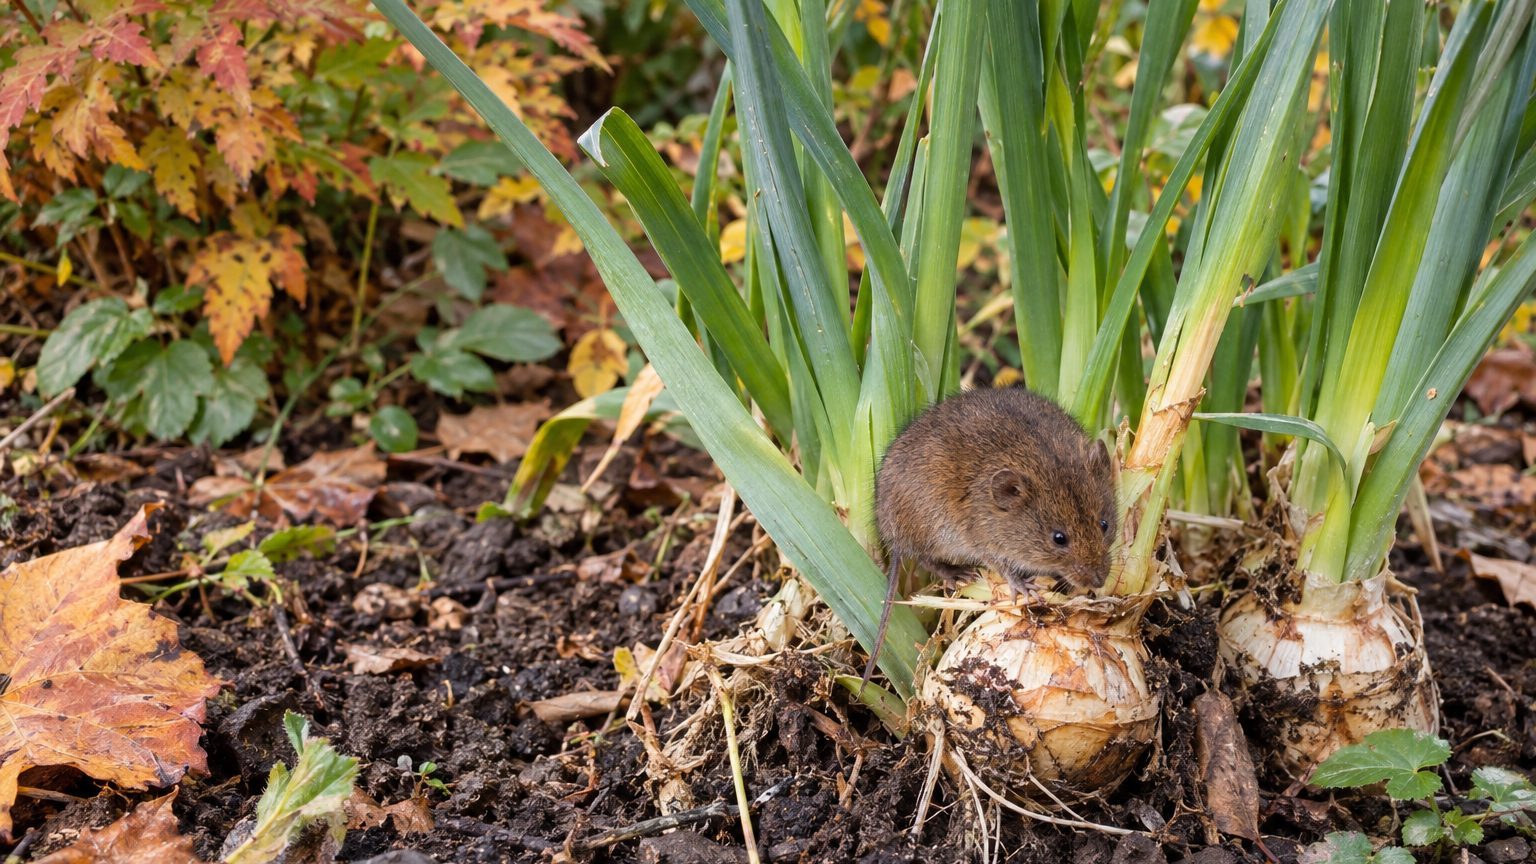
  • Voles are smaller than moles, about the size of a mouse.
  • Pine voles are reddish brown and 2-4 inches long, and their damage stays underground with no surface runways.
  • In Nebraska, individual tooth marks may be about 1/16-inch wide. They may be approximately ⅜-inch long.

Any of these near a bed of tulips or crocuses is a good reason to look closer.

Voles or Something Else?

Tunnels in a bed are not proof of voles. Moles leave similar trails and mounds, and the two animals often get blamed for each other’s work.

The bulbs tell the story. A mole is a meat-eater, so chewed or missing bulbs and roots point to a plant eater.

Looks like How to tell them apart
Moles: tunnels and mounds running through the bed Moles eat meat, so bulbs eaten or gone from the tunnel route mean voles. A vole is also smaller than a mole, about the size of a mouse.

Both can be present at once. Voles are opportunists and travel through tunnels that moles dug earlier, which gives them a ready path to flower bulbs and other roots.

What Causes Voles, and Where It Is Worst

Voles settle where the ground is moist and cool and where cover hides them. Garden beds with thick mulch, tall grass, brush piles and fallen debris give them exactly that. They tunnel under mulch to feed on roots and stems, and they will eat just about any kind of plant.

They stay active all year. In North Carolina, feeding can become particularly destructive in fall and winter, when voles burrow beneath the soil to stay warm. In Pennsylvania, voles store seeds, tubers, bulbs and rhizomes in late summer and fall, so a bed of bulbs makes a handy pantry.

Numbers can jump fast. Prairie and meadow voles normally have 5 to 10 litters per year, and populations are often cyclic, climbing from 10 to 250 voles per acre. In Nebraska, breeding runs through most of the year with peaks in spring and fall. Dense cover and mulch make a yard more appealing to voles.

How to Treat Voles

Treatment starts with finding where they work, then removing what shelters them and protecting what is left.

  1. Look over the beds for fresh trails, mounds and small holes, so that you know which plantings are being visited.
  2. Pull mulch back from bulb beds and clear fallen debris, so that the tunnels lose their cover.
  3. Replant lost tulips and crocuses inside cages or planting-hole liners of hardware cloth with openings of 1/4 inch or less, so that voles cannot squeeze through and the roots can still grow out.
  4. Set wire cylinders 18 to 24 inches high into the ground around young tree trunks, so that meadow voles cannot girdle the bark.

Leaves on surviving bulbs stay until they turn yellow.

How to Prevent Voles Coming Back

Voles return to yards that stay comfortable for them, so prevention follows the seasons.

  • Clear brush piles and cut down tall grass and dense vegetation near the beds to remove shelter.
  • Use mulch only where it is really needed and keep beds clear of fallen leaves and debris.
  • Keep grass well mowed beside gardens and around the base of trees to reduce cover.
  • In Pennsylvania, look for runways after the snow melts; they show where meadow voles traveled under the snow.
  • Keep cover from building up again along bed edges and fences.

Daffodils and alliums are generally more resistant to vole damage because of their unappealing taste.

Where This Comes From

Voles favor cool, moist beds that provide dense cover and easy access to roots and bulbs.

Common Questions

Do Voles Eat Daffodils?

Daffodils are generally more resistant because voles find them unappealing, and the same goes for alliums. Daffodils are also poisonous to rodents and deer, so they make a safe choice in beds where voles are a worry.

When Is Vole Damage to Trees Worst?

In Nebraska, voles usually damage woody plants from late fall through early spring. In Pennsylvania, bark damage is generally most severe in winter, when other food sources are limited.

Do Voles Eat Seeds and Young Plants Too?

They do. Voles clip off young plants and dig up seeds, and they can damage or eat garden plants and vegetables as well as flower bulbs. They also gnaw the roots of trees and shrubs.

Thrips on Spring Bulbs: How to Spot Them and Get Rid of Them

Thrips on Spring Bulbs: How to Spot Them and Get Rid of Them

Silvery speckles on a leaf, or petals that look scuffed before they open, often point to a pest too small to notice at first glance. Thrips feed on spring bulbs and their relatives through the growing season, and the damage shows up well before the insects do. Knowing what the scarring looks like, and where the insects hide, makes them manageable.

Thrips: What You See

The insect itself is hard to spot, so the damage is usually what gives it away.

  • Silver or bronze speckles on the surface of leaves or petals come from species that inject digestive enzymes into the wound as they feed.
  • Leaves that look scarred and stippled, then twist or crinkle because they stop elongating properly, are the usual sign in Kentucky.
  • The insects are slim, winged and only about 1/20 of an inch long, so they look like moving specks.
  • Look low in the plant, where young leaves gather in the inner neck, because young and adult thrips both settle there.
  • On gladiolus, look at the flowers and the corms, where gladiolus thrips gather, with dark bodies and grayish wings.

Warm spring weather is when adults start flying to new plantings, so that is the time to start checking.

Thrips or Something Else?

Silvery stippling is not a signature that belongs to thrips alone. Other small pests leave a similar pattern, and treating the wrong one wastes effort.

A quick test helps. Hold a sheet of white paper under a leaf, tap the leaf, and watch what falls and moves.

Looks like How to tell them apart
Spider mites: fine pale stippling on leaves Fine webbing on the underside of the leaf, and tapped specks that crawl without wings
Aphids: distorted, curled new growth Soft, pear-shaped insects clustered on the stems and buds, with a sticky film on the leaves below
Thrips: silver or bronze speckles Slim winged specks hiding in the inner neck, and scarring that clusters on the youngest leaves

Cold or dry spells can also leave pale, scuffed leaves, but those marks show up on a whole bed at once and no insects turn up on the paper.

What Causes Thrips, and Where It Is Worst

Thrips arrive on their own. They have a broad host range, so weeds, crop debris and neighboring plants all keep them nearby. Weeds inside or outside a high tunnel can harbor them, and in mild climates they overwinter as adults or larvae on debris and weeds, ready for spring.

Warmth speeds them up. Their populations increase rapidly under hot, arid conditions. In Kentucky, development from egg to adult can take as little as 20 days, and a single year can bring 6 to 8 generations, so a few insects in spring can become a crowd by summer. In Utah, adults fly to new onion plantings once spring temperatures warm.

Gladiolus thrips follow a different pattern. This tropical species will not survive temperatures colder than 50° F (10° C), so in cold-winter yards it carries over on stored corms, bulbs, or plants kept in a greenhouse. They also infest iris, lily, and other plants grown from tubers and bulbs.

How to Treat Thrips

Start with the cheapest steps, and work toward anything stronger only if the damage keeps spreading.

  1. Inspect the inner neck of the plants and the youngest leaves, so that you confirm thrips before doing anything else.
  2. Pull weeds around the bed and along its edges, so that the insects lose a place to live and breed.
  3. Clear plant debris from the bed, so that adults and larvae have nowhere to wait out the cool months.
  4. Hang blue or yellow sticky traps near the plants, so that you can see whether numbers are rising or falling.
  5. Look over gladiolus corms and bulbs that you handle, so that infested ones do not carry the pest into next season.
  6. Contact your state extension service about what is approved in your state, so that any spray you choose is legal and suited to your plants.

Timing matters because the life cycle moves quickly. In Kentucky, females insert eggs into plant tissue and the nymphs emerge 4 to 10 days later. The young feed for 5 to 7 days before dropping into the soil to pupate. Keep checking regularly instead of treating once and walking away. Leave green foliage alone: the leaves are still feeding the bulb for next year, even when they look scuffed.

How to Prevent Thrips Coming Back

Prevention follows the calendar, because thrips move with the weather and the state of the bed.

  • In early spring, pull weeds in and around the bed before adults begin flying to new plantings.
  • Once the weather warms, set out sticky traps and look at them regularly, since numbers climb fast in warm, dry spells.
  • Through the growing season, check the inner neck of the plants now and then, because young leaves there are where thrips like to feed.
  • After the leaves have turned yellow and withered, clear the debris from the bed so overwintering adults and larvae lose their cover.
  • At lifting time in fall, look over gladiolus corms and any other bulbs you dig before they go into storage.
  • In winter, keep greenhouse plants away from stored corms and bulbs, since thrips can overwinter on either.

Any bulb still unplanted can go in as soon as the ground can be dug, and a clean bed gives it a better start.

Where This Comes From

The details here come from university extension pages written for Kentucky, Utah and Virginia, and timing can differ in your yard. Your state’s extension service can tell you which thrips are active locally and what is approved for use there.

Common Questions

Do Thrips Spread Disease in the Garden?

They often carry plant diseases from one plant to the next as they scrape and suck plant fluids. That is one more reason to deal with them early, even when the visible scarring looks minor.

Are Thrips Attracted to Flowers?

Adults are drawn to flower pollen. Even so, young and adult thrips mostly feed on plant tissue, using rasping and sucking mouthparts to draw out plant fluids, so leaves are damaged too.

Can Thrips Hurt Onions Growing Near Your Bulbs?

Yes. Thrips damage to bulb onions costs yield and storage quality, and the early stage of bulb development is when the plants are most sensitive. Check onions and ornamentals alike when you see speckling.

Squirrels on Spring Bulbs: How to Spot Them and Get Rid of Them

Squirrels on Spring Bulbs: How to Spot Them and Get Rid of Them

Scattered bulbs on top of the soil, or a row of small empty holes where you planted last week, usually mean a squirrel has been through the bed. Tulips and crocuses are the usual targets, and the damage tends to show up soon after planting in the fall. A few simple barriers protect them.

Squirrels: What You See

Squirrels leave a pattern in the bed, and the clues are easy to read once you know where to look.

  • Bulbs lie loose on the surface of the soil or across the lawn nearby, often with the papery skins torn off.
  • Small, shallow holes appear in freshly planted ground, usually in the days after the bed was dug.
  • Tulip bulbs and crocus corms go missing, leaving gaps in a planting that should be filling in.
  • Soil is kicked out onto the path or the edge of the bed, as if something was digging in a hurry.
  • Daffodil bulbs stay where you put them, even when the bulbs beside them have been dug up.

That last sign matters, because a bed with only daffodils left intact points to a digger that knows what it likes.

Squirrels or Something Else?

Other animals take bulbs too, and the fix differs. The difference is in what remains: a squirrel works from the top down and leaves a mess of soil, while others leave the surface tidy or chew the plant rather than the bulb.

Looks like How to tell them apart
Voles or mice Bulbs vanish without a crater on top, and you may find narrow tunnels in the soil or lawn edge, where a squirrel would leave open holes and loose soil.
Rabbits or deer Leaves and shoots are nibbled off cleanly in spring, but the bulb is still in the ground when you lift a clump to look.
Dogs or other diggers Holes are wide and deep and cut across several plantings, rather than small and scattered near newly turned soil.

Chipmunks can also take bulbs and leave small holes, so a quick look at the hole size and whether bulbs are lying on top helps settle it.

What Causes Squirrels, and Where It Is Worst

Squirrels watch people plant. Freshly dug earth works like an X marking the spot, and a bulb is an easy meal buried just under it. The soil you turned over to plant is exactly what draws them in.

Nothing about this is limited to one climate or soil type. A Colorado gardener describes finding newly planted bulbs scattered around the yard after a night of rodent feasting, and in Nebraska tree squirrels are known to dig up bulbs and seeds, bury nuts in turf and landscaped beds, and chew on spring potted plants. Wherever tree squirrels live near your yard, the bed is at risk.

The risk is highest right after planting, when the soil is loose and the scent is fresh. Beds close to trees, fences or feeders get more visits, since that is where squirrels already travel.

How to Treat Squirrels

The most dependable fix is a physical barrier set in place as you plant, and the order of the steps matters because the wire has to go under the bulbs and over them.

  1. Dig a trench slightly deeper than the planting depth you want, so that the wire at the bottom sits below the bulbs.
  2. Lay poultry wire along the bottom of the trench so squirrels can’t tunnel up from underneath.
  3. Add soil and set the bulbs at their usual depth, so they grow normally above the lower wire.
  4. Lay another strip of poultry wire over the planting, so that the bulbs are completely encased.
  5. Finish by covering the wire with dirt, so that the bed looks untouched and gives squirrels nothing to notice.

Fallen leaves also work as a cover. Spread a generous layer over the planting area, lay a square of burlap on top, and pin it down with landscape staples driven in with a mallet or hammer. In Colorado, a wrap of 1″ wire mesh is used around tulips and other bulbs. Contact your state’s cooperative extension office for what is approved where you live before using any repellent or trap.

How to Prevent Squirrels Coming Back

Prevention follows the gardening year, with most of the effort at planting time and little afterward.

  • In fall, as soon as the bulbs are in, smooth the soil and cover it the same day, so squirrels never see bare, freshly dug earth.
  • After planting, put the leaf and burlap cover over the bed, since leaves insulate the soil and hide the spot.
  • In the first winter, check that the staples and wire edges are still holding after wind and rain.
  • In spring, leave the foliage alone as it grows and fades, because the leaves feed the bulb for next year.
  • Through the seasons, keep bird feeders away from bulb beds, since squirrels raid them and then keep returning to the area.

Fall is the key moment, because once the first season passes, the bulbs are less of a target.

Where This Comes From

The advice here draws on university extension and government pages written for gardeners in states such as Colorado and Nebraska. Rules and approved methods vary by state, so check with your state’s cooperative extension service before relying on any single approach.

Common Questions

Do Squirrels Eat Daffodil Bulbs?

Rarely. Daffodil bulbs are poisonous to squirrels and generally remain untouched, which makes them a safe pick for beds that get raided every year.

Can You Use Chicken Wire Over a Bulb Bed?

Yes. Cover the bed with chicken wire and bury it under soil. Extend the wire beyond the edge of the flower bed so squirrels can’t dig around it.

Do Squirrels Damage Anything Besides Bulbs?

They do. Squirrels strip bark from trees, usually in winter and spring, and clip twigs most often in spring and early fall. They also raid bird feeders and sometimes destroy them to reach the food.

Do You Have to Cover Bulbs Every Year?

Not for the long-lived kinds. Daffodils, muscari and crocus come back each year without being dug up, so the cover is only needed the year they are first planted.

The almanac, state by state. Every date on this site comes from a state’s own frost facts and its extension service’s calendar — and says where it comes from.